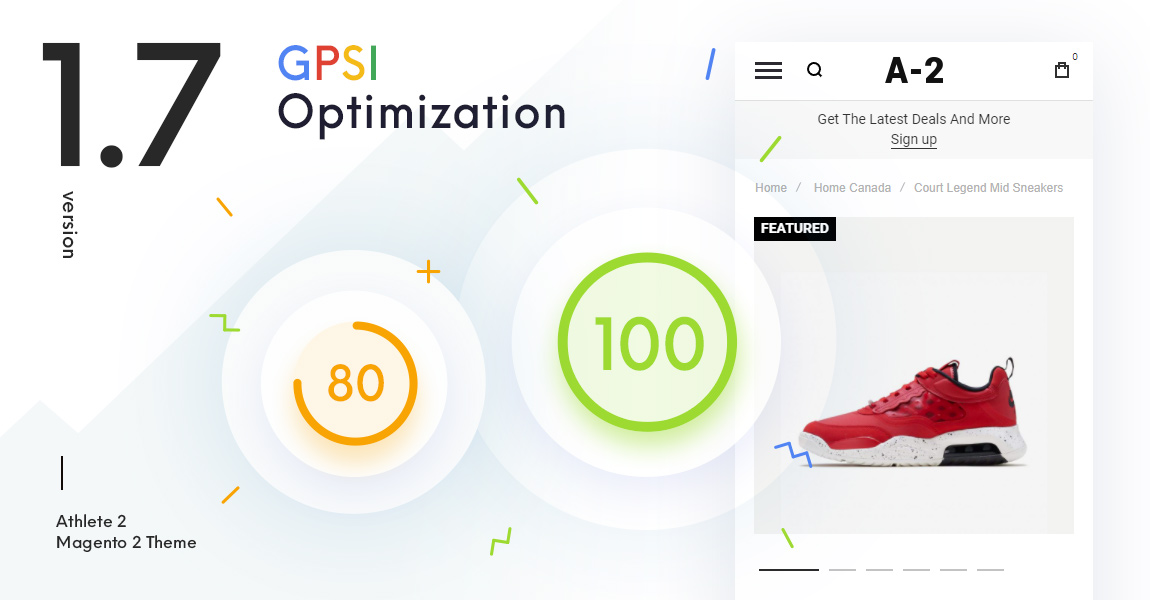
We’ve made a lot of changes in version 1.7 of Athlete2 Magento 2 theme which improves google page speed scores for mobile. Improvements are also affected desktop test results, so you can now easily have 90-100 scores on most pages. In this article I’ll briefly describe what we done and what you can do to get better google page speed score. Mostly for product pages. While this article contains some general page speed optimization recommendations, it is oriented on customers of Athlete 2 Magento 2 theme.
Does Santa Claus exist?
Before we start, I’d like to clarify following:
You will not get high page speed scores simply by installing the theme, it is not possible.
And a few more basics:
- I want you to ask your self a question: do you really need high Page speed score? Because if you don’t do SEO you are probably wasting time with page speed optimization. Making your website faster is always a good idea, just don’t be obsessed with the test scores.
- You can have different page speed scores on the same page depending on the theme features used, so you should choose what is more important for you: Page speed or website appearance and UX. Because you will have to sacrifice something. You can’t have high page speed score with exactly the same features (unless you are going to cheat the page speed test).
- Page speed test is a page test. It is not a theme or a website test. Each page has its own scores and while theme can affect it, it is only one piece in a chain. Most important part is content that you have on each page and features that you use. If you are adding huge images lots of 3rd party extension and custom scripts, then theme will not help you to improve page speed scores. And don’t forget that themes are not standalone products, they are made for various CMS. Some CMS have better page speed scores, some worse and their base speed metrics are changed from update to update. So theme can’t magically improve your page speed score single-handedly, optimization should be done in complex.
- And again, We’ve fixed general issues with page speed caused by the theme, but main optimization in version 1.7 was made for product page. For pristine product pages. If you are adding 3rd party extensions and additional content, scripts, or anything that doesn’t come with the theme to the product or any other pages, then it is your responsibility to make sure that this content doesn’t affect page speed.
- You can have any content on CMS pages, so we can’t make optimizations for them, you will have to do it yourself. However you can read some recommendations for cms pages below.
- You don’t have to optimize all of the pages on your website. You can make some pages for SEO and some for people(e.g. where you bring people via ads/social networks). It is not only google bot visiting your website after all and not all people come from search engine.
- And so, not all of the pages on our demos are optimized for page speed scores. Some are optimized to demonstrate page speed scores but some are focused on design and features heavy sliders.
Prerequisites
Below instructions are for clean Athlete2 theme and not for all of the 3rd party extensions and custom code that you have on your website. So you need to remove/disable all 3rd party code/extensions, before you can start testing theme page speed. Only when you are satisfied with results that you get with the theme, you can start enabling 3rd party extensions and custom code and check how it affect page speed.
How to run Page Speed Test Correctly
You have to test multiple times and warmup cache before testing. For example, you made some changes on your website and cleared cache. Open page that you are planning to test in a browser first and only after that make few tests in page speed insights.
Also note that test results are cached: https://developers.google.com/speed/docs/insights/faq#whyonlinestale
The speed data shown in PSI is not updated in real-time. The reported metrics reflect the user experience over the trailing thirty days and are updated on a daily basis. For the Optimization score, PageSpeed Insights caches results for a short period of time and any changes you’ve made to implement suggested optimizations should be recognized within a few minutes.
So, you may get the same results after you’ve made some changes because you are getting cached test results.
Don’t blindly follow google page speed suggestions
You can see block with following text on google page speed results:
Opportunities These suggestions can help your page load faster. They don't directly affect the Performance score.
What google say is that if, for example, you will “Serve images in next-gen formats” than you can save some Kb and your website should load faster after that. But it doesn’t mean that it will improve your page speed score. In most cases it will not.
Those suggestion are general, not accurate and as google says: not directly related to page speed score. It’s not that simple.
Google Page Speed Insight requirements are constantly changing
Another huge problem with google page speed optimization is that they regularly release updates to their testing tool. You can spend a lot of time optimizing your website to get higher scores and then they release another update. For example we released version 1.7 of Athlete 2 theme with optimizations on August 30 but then google released version 8.4.0 of Lighthouse ( website auditing tool used for page speed tests) on September 9 and we see that metric changed a bit. Now version 8.5.1 was released few days ago which drops scores even more and it soon will be used by google page speed insights. So optimization is not one time task, it must be done constantly and adapt to new requirements. And we are continue to work on it.
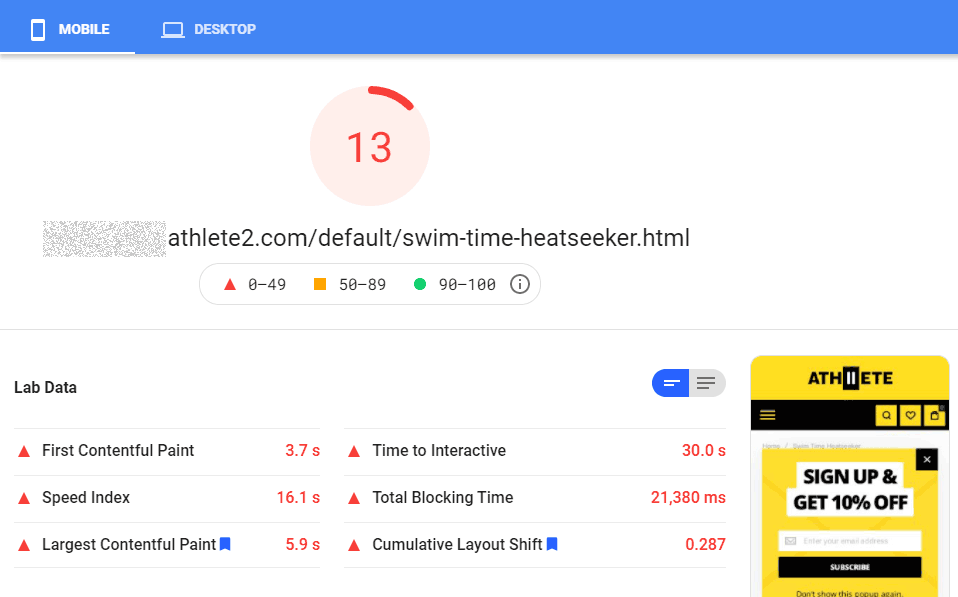
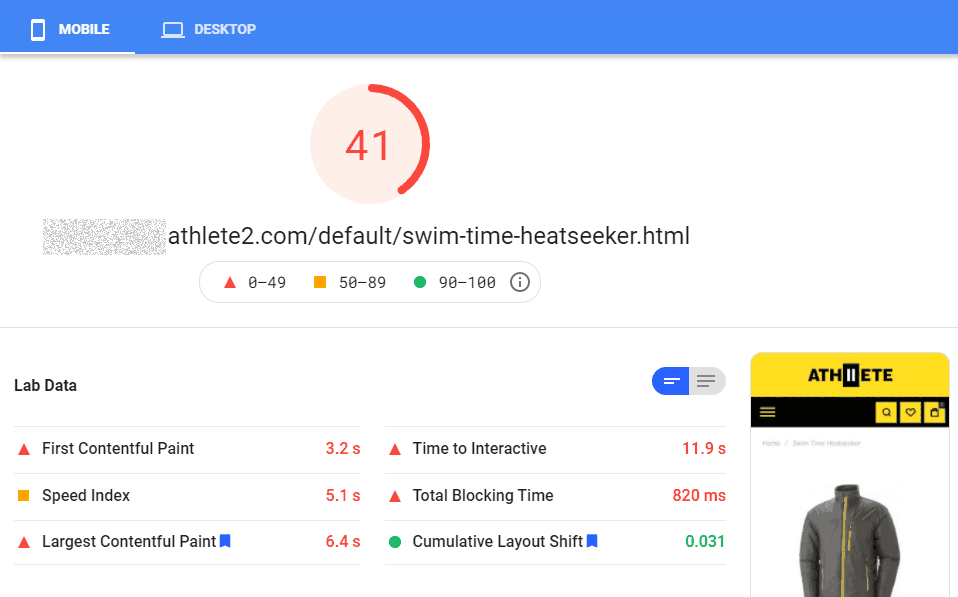
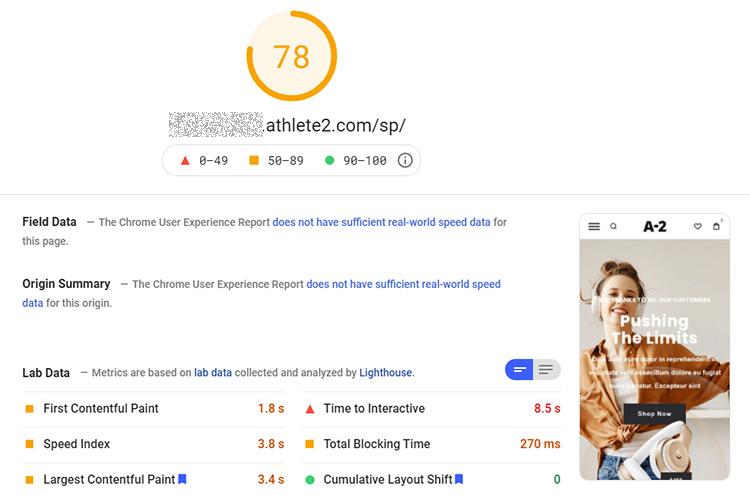
Initial Tests
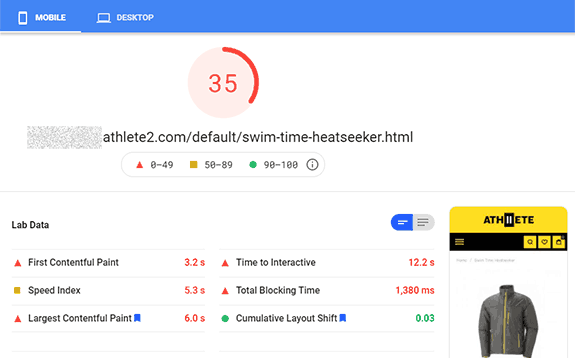
First thing that we are going to do is to check page speed scores before theme update. Here are the results for different pages on different demos. Please note that demos are not predefined, they are simply combination of a various theme settings. I’ve made tests for demo which features Magento default product gallery (Fotorama):
and a simple grid gallery, which is wrapped in owl carousel slider with photoswipe (for modal with full sized images) on mobile:
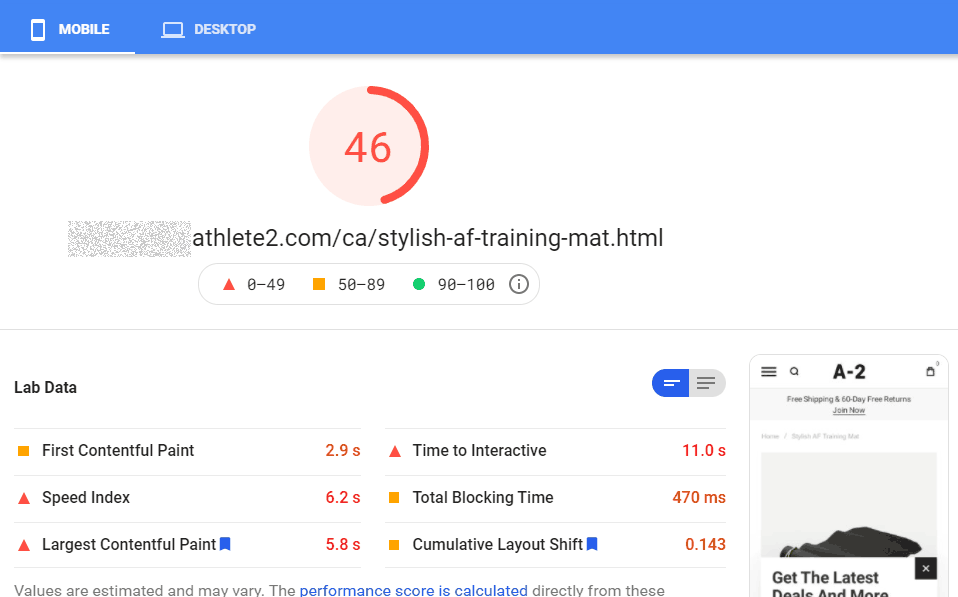
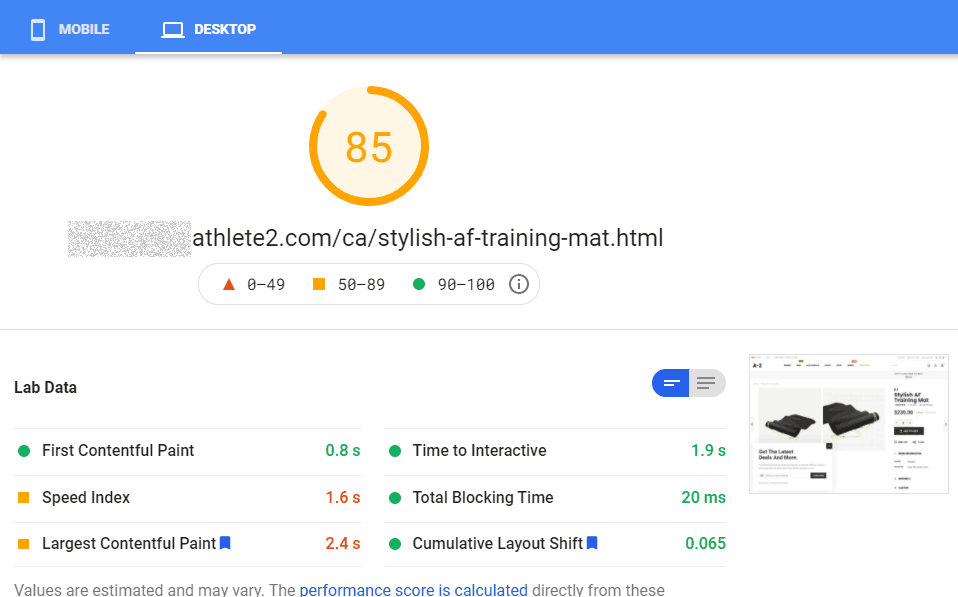
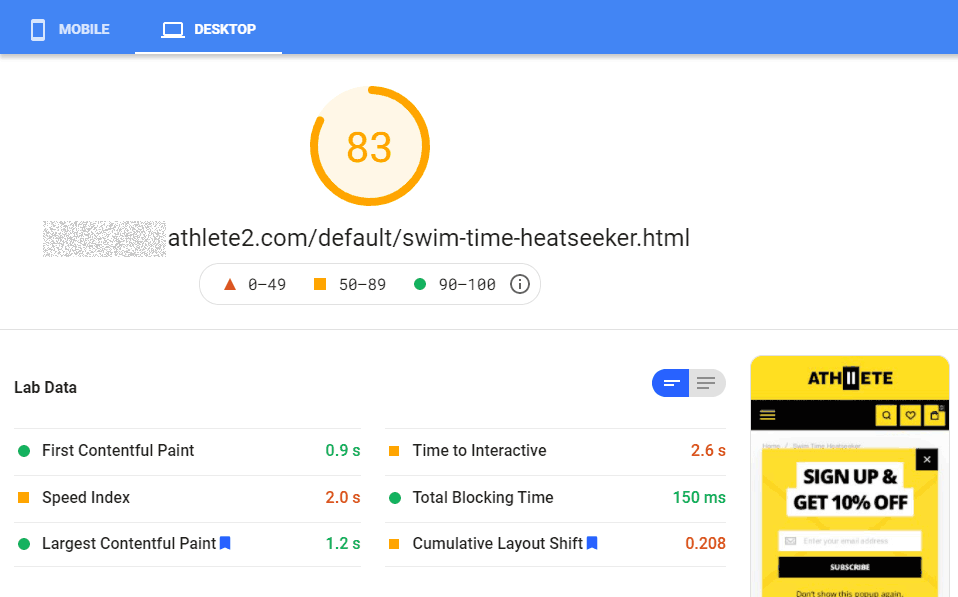
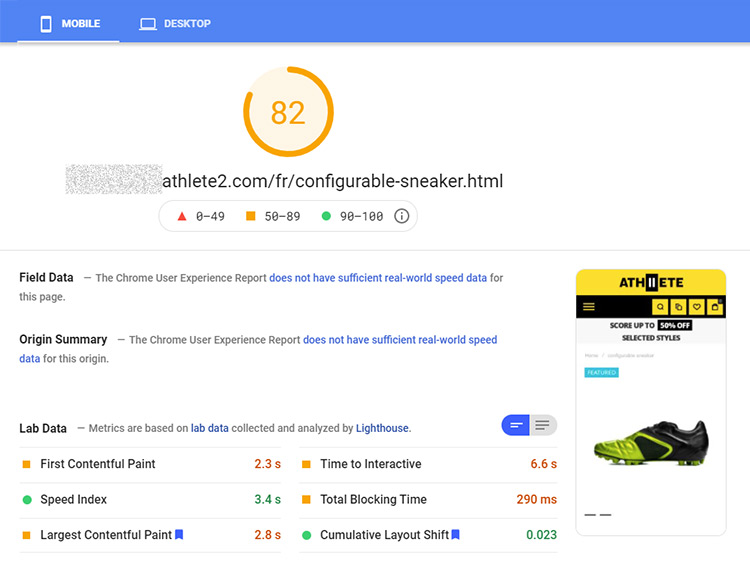
Theme version 1.7 page speed results, out of the box
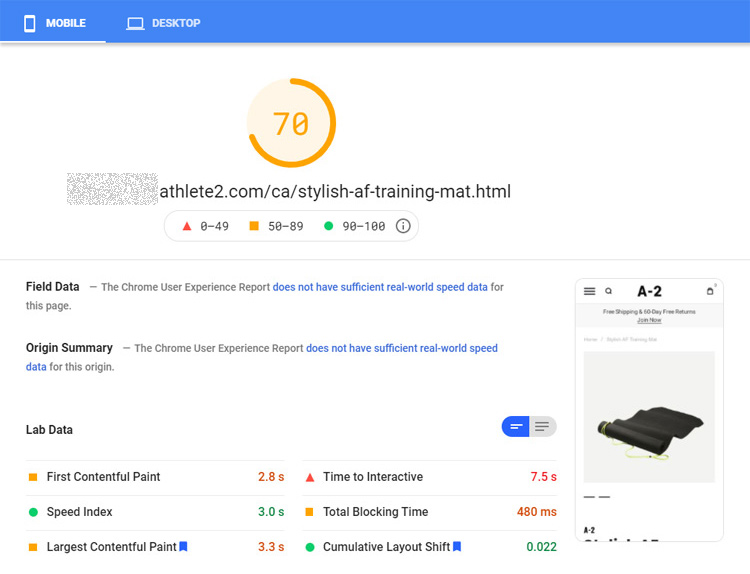
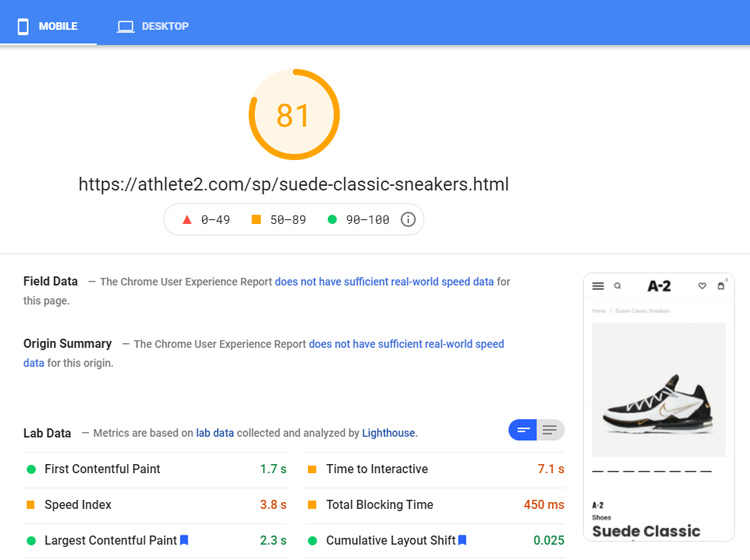
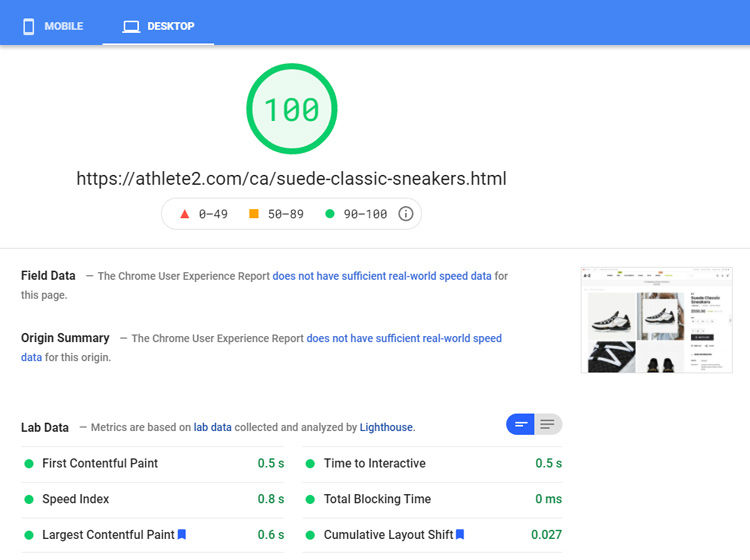
Below are results for product pages after installing theme version 1.7. Tests were made without basic Magento optimization such as merged and minified css/js and without server-side cache.
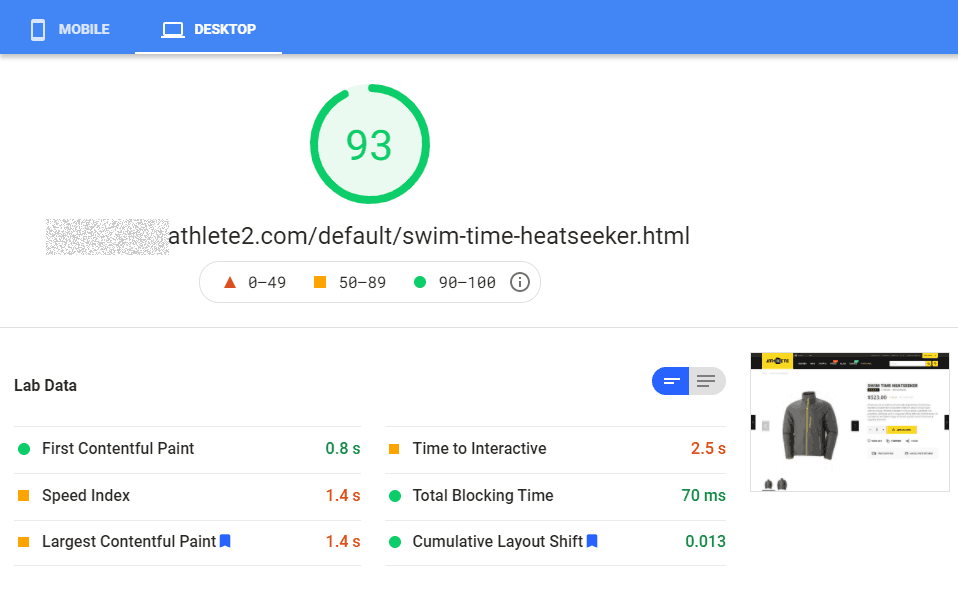
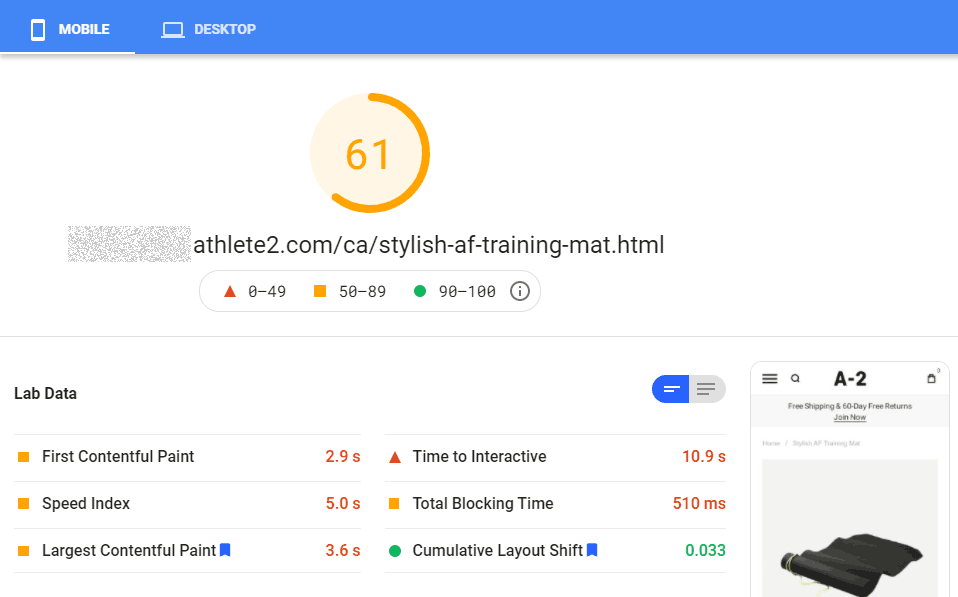
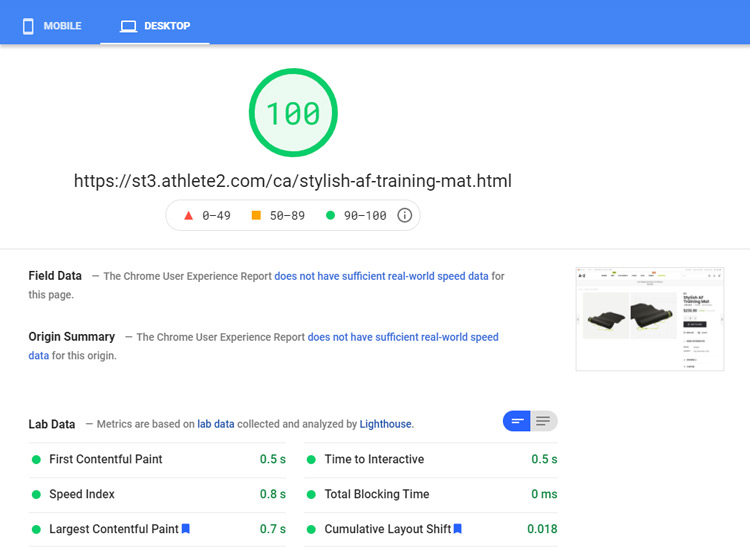
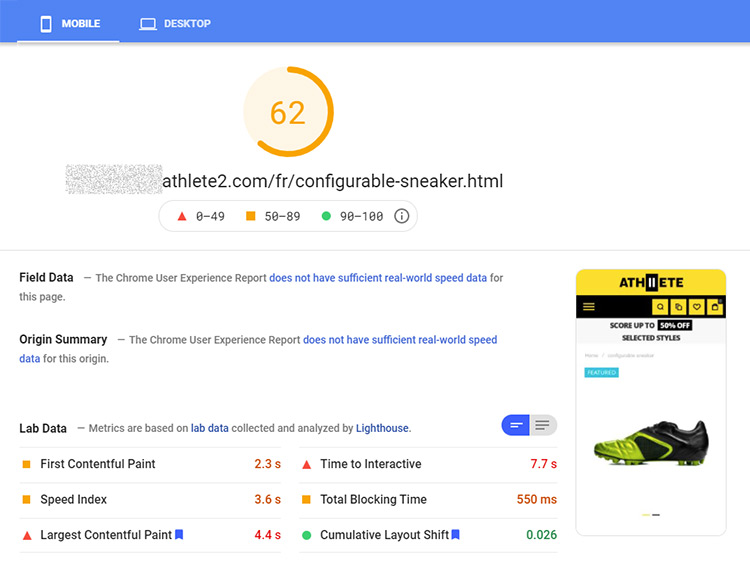
English Demo – Product Page with Fotorama:
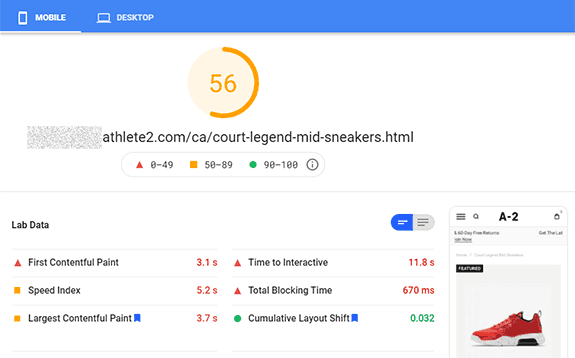
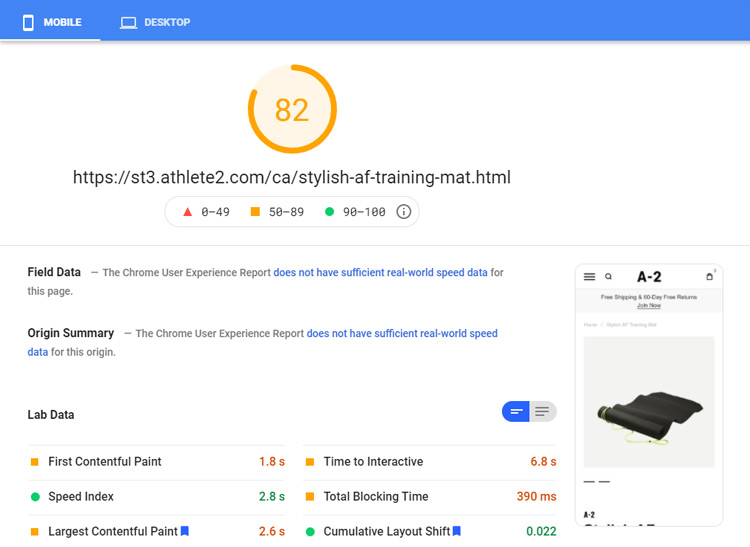
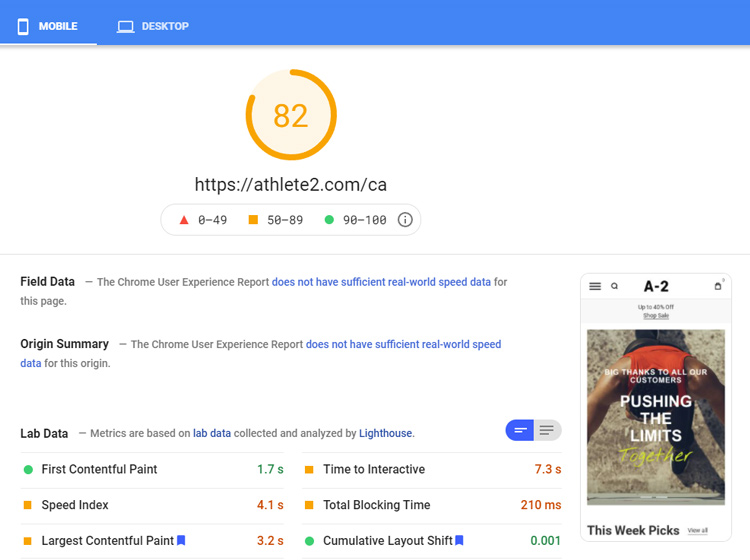
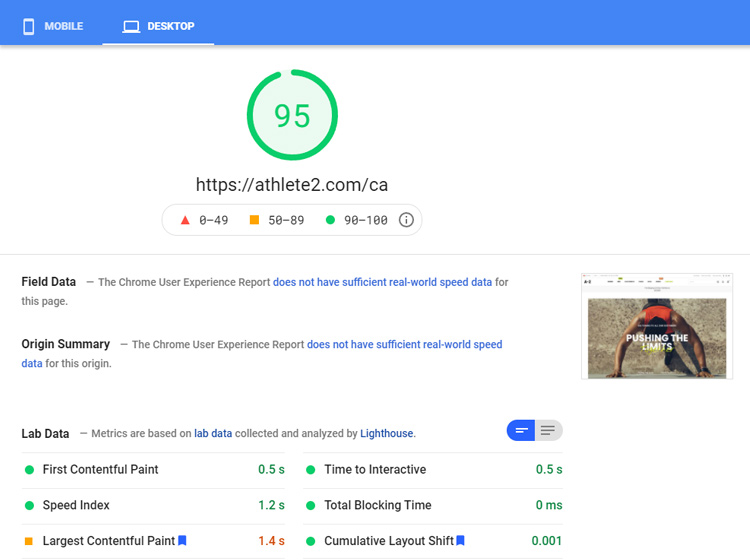
Canada Demo – Product page with owl carousel + photoswipe on mobile and simple grid in desktop:
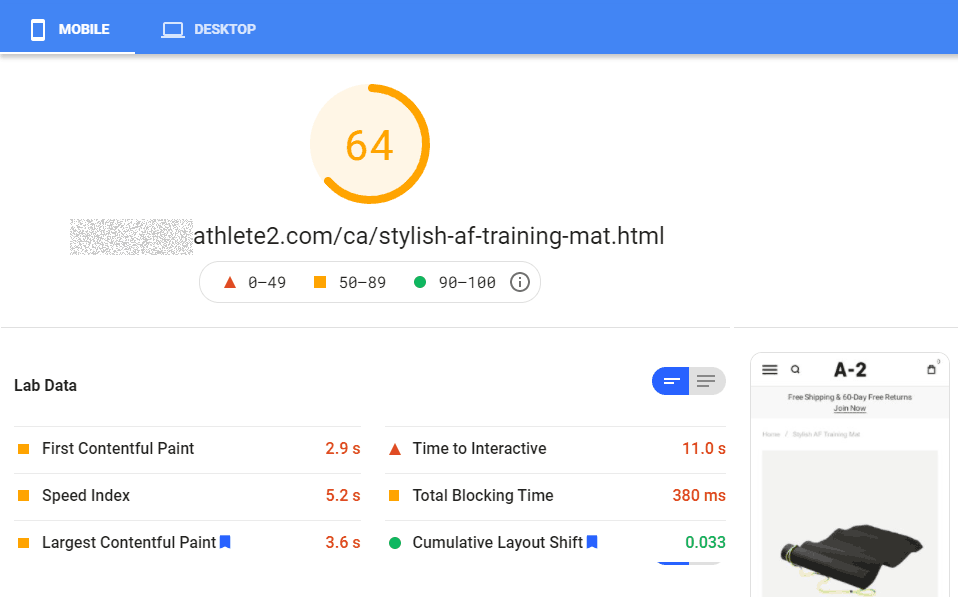
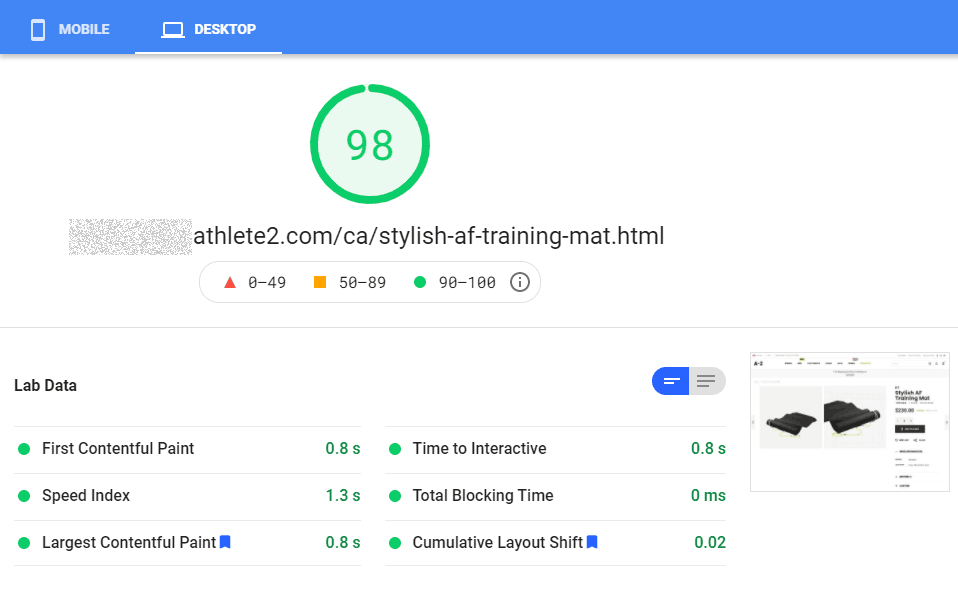
As you can see page speed score is better than before the update on our demos. Note that you may not get any improvements in page speed after update. Why? First of all, because you may not use some of the features which affected page speed. For example in version 1.7 we postponed newsletter popup load so it is now do not affect page speed. So if you do use newsletter popup on your website then you will not get any improvements and so on. You can check full list of improvements in our changelog. Another reason why you may not see any improvements in page speed after update are 3rd party extensions, css and scripts.
What we did:
One of the main reasons of improved scores on the default (English) demo which features “Fotorama” gallery is that we removed our “Fast” Fotorama version and replace it with Magento’s default “Fotorama”. The idea of a “fast” gallery was to show product image to customers as soon as possible before the “Fotorama” is loaded. But google is waiting for the entire “Fotorama” to be loaded before it count it so from google point of view it is not fast. Duh.
On the demo with grid gallery we now load “Photoswipe” gallery (which shows full sized product images) on click. This removed pretty heavy js and css from initial page load and so improved speed score.
But lets talk about what you can do to improve page speed on your website.
What you can do:
List of Recommendations
Below are steps to get best page speed scores on mobile for product page in Athlete 2 in short, without details.
Prerequisites:
- Disable all third party extensions. Some of them can ruin your page speed score. Enable them back after you get good results with the theme and check if they affect page speed score. Revolution Slider is also a 3rd party extension. Try not using it on product page. Impact: Highest
- Completely remove extensions that you do not use. Not just disable via admin panel.
- Remove 3rd party libraries, if you added any. E.g. complete Bootstrap is huge and you are probably using a few % of it. At the worst, add only code that you are using and remove the rest (this will require time and some knowledge).
- Update and disable analytics and other 3rd party scripts. No, not forever. This is a theme test, so it should be clear. Enable it back, once you finished with the theme optimization.
- Do not load your custom css in a separate file. Add it to theme less or custom css (Athlete2 / Theme Appearance / Custom Css) option (unless you are adding it to a specific pages only).
- Remove Magento 2 Page Builder. It adds unused css and js. A lot of it. What? You like it? Well, you have to decide: page builder or page speed.
Theme Related:
- Make sure that theme built-in lazy load is enabled. Athete2 / Theme Settings / General : Lazy load. Impact: Low-High
- Enable svg or image placeholders for lazy load (Athete2 / Theme Settings / General : Generate SVG Placeholder or Create Image Placeholder). Test which works better for you. Impact: Low-High
- Enable Defer JS ( Athete2 / Theme Settings / General : Defer JS )
- Install and enable Athlete2 mobile theme. Impact: Allows to use mobile specific settings
- Disable FontAwesome ( Athete2 / Theme Appearance / General: Enable FontAwesome ). Impact: High
- Either use less google fonts with couple font weight or use self hosted fonts. Best option should be to use self-hosted fonts, because you can add multiple self-hosted fonts for desktop but load only 1-2 fonts on mobile. We do this on our demos. Impact: High
- Disable JS for Waypoints and self-hosted Video if you don’t use it (Athete2 / Theme Settings / General: Enable Waypoints and Enable JS for self hosted Video). Impact: Very Small
- Disable Sticky header for mobile (Athete2 / Theme Settings / Header : Sticky Header : Disable sticky header in Mobile Theme). Impact: Very Small
- Important:Enable inline dynamic css if you are using mobile theme, so you get different dynamic css generated for desktop and mobile. ( Athete2 / Theme Appearance / Custom Css : Save Custom Css Inline )
- Enable css-only product gallery for mobile if you use Fotorama gallery (Athete2 / Theme Settings / Product Page : Replace Fotorama with CSS-Only gallery in Mobile Theme), you can also try it instead of carousel, if you use grid gallery (Carousel Gallery on Mobile – CSS Only). Requires athlete2 mobile theme. Impact: High
- Enable preload for first gallery image on product page, in case you don’t have other preloads. Otherwise, most likely, you will get better results if you disable it. ( Athete2 / Theme Settings / Product Page: Preload First Product Image ). This option is almost required if you enabled css-only gallery.
- Remove default Magento 2 modules that you do not use. Impact: Very Small.
- Remove unused Magento JS. Impact: Very Small
General:
- Follow basic optimization recommendations: Enabled Cache, JS & CSS minify and merge, Enable Production mode, etc. https://olegnax.com/magento-2-speed-optimization-guide/
- Use Varnish and/or other server-side cache. Impact: Low on page speed scores but can be very high on actual website load time. Varnish setup: https://olegnax.com/speed-up-magento-2-with-varnish-and-nginx-as-ssl-termination-on-ubuntu/
- Separate Varnish cache for mobile and desktop theme: https://www.scommerce-mage.com/blog/magento-2-varnish-device-detection.html
- Choose proper hosting.
You can dive into some details below, if you wish.
General Optimization
Below are some recommendations that can improve page speed scores for all pages, with detailed instructions.
1.Fonts
This is one of the most important steps. Fonts have the greatest impact on page loading speed.
- FontAwesome or other font icons – optimize or do not use it.
- Add as less fonts as possible. Reduce fonts size.
- Use self-hosted fonts instead of google fonts.
1.1. Disable FontAwesome.
Either disable it completely and use inline svg instead or compile a custom font with only icons that you use, instead of loading entire FontAwesome, which is huge.
It is already disabled in our preview on some demos so lets enable it back and see the difference (Theme Appearance / General : Enable FontAwesome ):
Enabled FontAwesome:
Disabled FontAwesome:
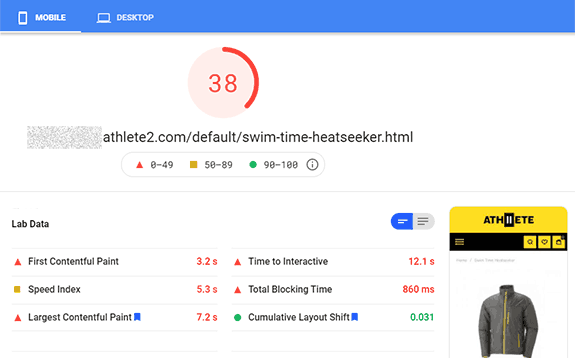

As you can see Total blocking time doubled with enabled FontAwesome.
You can say that FontAwesome can be loaded after page load and do not affect the page speed. Yeah, but you still need to load its huge library of icons to only use few of them. And those few icons won’t be displayed until FontAwesome is loaded.
What you can do instead:
1. Easy way: Add inline svg instead of a font icons.
We use inline svg icons often in theme. For example icons in block above footer are place directly in cms block content:
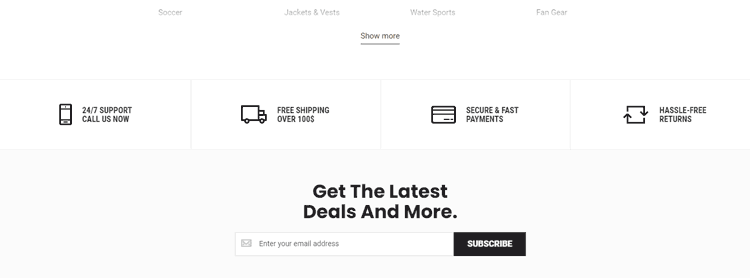
This is the best option if you need only few icons which will be displayed on a few pages. You are not limited to a single icons font, like when you load fontawesome library. And inline svg will not affect page speed scores.
How to add FontAwesome icons as inline svg to page content:
- Download FontAwesome sources: https://fontawesome.com/download
- Open “svgs” folder, which contain individual SVG for each icon
- Open desired icon in any text editor and copy its content.
- Paste copied code to your website page content or any text editor on in your CMS backend. You will get something like that:
<svg xmlns="http://www.w3.org/2000/svg" viewBox="0 0 512 512">...</svg>- Add width and height attributes to svg tag adjust icon size, e.g.:
<svg xmlns="http://www.w3.org/2000/svg" width="30" height="30" viewBox="0 0 512 512">...</svg>Or you can inline svg in css, if you need to use the same icon multiple times, like this:
.some-custom-svg-icon {
  background: url('data:image/svg+xml;utf8,...your svg icon here...') center center no-repeat;
}
E.g.:
.some-custom-svg-icon {
background: url('data:image/svg+xml;utf8,<svg xmlns="http://www.w3.org/2000/svg" viewBox="0 0 448 512"><path d="M400 64h-48V12c0-6.6-5.4-12-12-12h-40c-6.6 0-12 5.4-12 12v52H160V12c0-6.6-5.4-12-12-12h-40c-6.6 0-12 5.4-12 12v52H48C21.5 64 0 85.5 0 112v352c0 26.5 21.5 48 48 48h352c26.5 0 48-21.5 48-48V112c0-26.5-21.5-48-48-48zm-6 400H54c-3.3 0-6-2.7-6-6V160h352v298c0 3.3-2.7 6-6 6z"/></svg>') center center no-repeat;
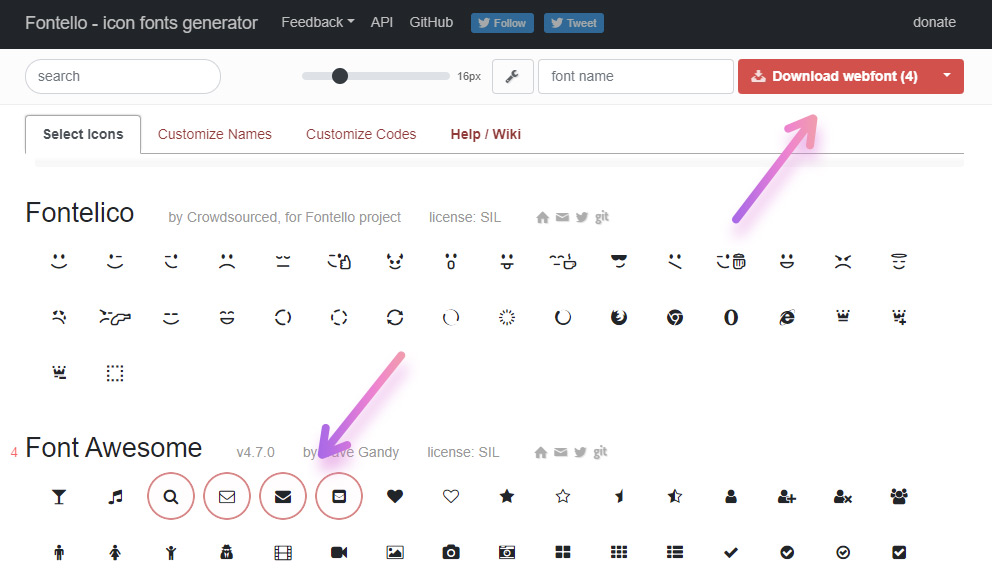
}2. Hard way: Create custom icon font.
If you need many icons which you are going to use on all or many pages, then you can create a custom font for your website. This is not the best option for page speed score but if font won’t be too big it can also work.
The process is like “click, click and download”. Use some of the online services like: https://fontello.com, https://icomoon.io, https://fontastic.me and so on. Simply choose icons by clicking on them and then click download button. You will download a font files with the selected icons.
Now you need to add this font to a Magento 2 theme. This will be a bit of a hassle for a none tech person.
How to add icons font to Magento 2 Theme.
It is a font so basically, you need to follow instructions how to add custom font in Magento 2. Below I’ve described some more details for Fontello generated archive:
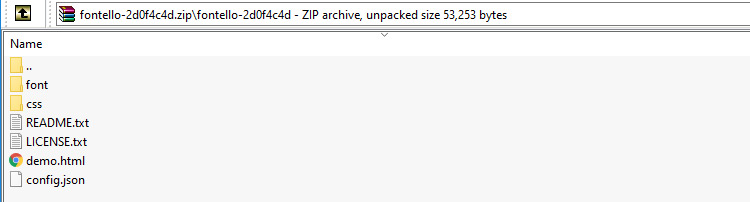
- Open downloaded archive and copy files from “font” folder in
app/design/frontend/[Namespace]/[YourTheme]/web/fonts/[YourIconsFont]/. E.g.:app/design/frontend/Olegnax/athlete2/web/fonts/fontello - Now open css folder in archive and copy fontello.css to app/design/frontend/Olegnax/athlete2/web/css/source.
- Rename it to _fontello.less and add following record in _sources.less:
@import '_fontello.less'; - Open fontello.less and change font urls. By default they look like this:
src: url('../font/fontello.eot?39178883');
src: url('../font/fontello.eot?39178883#iefix') format('embedded-opentype'),
url('../font/fontello.woff2?39178883') format('woff2'),
...
You need to set your font folder name. We placed our custom font in folder named “fontello” in the first step. So the new code should look like this:
src: url('@{baseDir}fonts/fontello/fontello.eot?39178883');
src: url('@{baseDir}fonts/fontello/fontello.eot?39178883#iefix') format('embedded-opentype'),
url('@{baseDir}fonts/fontello/fontello.woff2?39178883') format('woff2'),
...
That is all. Now you need to deploy static content using following magento command:
php bin/magento s:s:dHow to use newly added font icons:
You can check _fontello.less for icon classes (or even change them if needed). For example:
.icon-search:before { content: '\e800'; }So to add search icon in content you need to add following code:
<i class="icon-search"></i>1.2. Reduce amount of fonts and try not to use google fonts.
Fonts can be one of the most heaviest part of your website page. On our Canada demo we use “Roboto” for content, “Roboto Condensed” for menu, “Poppins” for huge headings and “Nothing You Could Do” for fancy hand drawn titles, in addition to the default Magento font “Open Sans”. So you load 5 fonts in multiple font weights. The first optimization that you can do is to load less font weights for each font.
These options was added long ago in our theme. You can easily choose what font weight to load for each google font via admin panel. But better option would be to not only use less font weight but also load less fonts.
The better results you want to get, the less fonts you should use. You can end up with only two fonts, e.g.: “Nothing You Could Do” for a hand drawn text and “Roboto” for the rest of the website fonts. Yes, website will not look exactly the same, so you should decide what is more important for you, once again. Or if you want to go even further, you can add hand drawn text as an image instead of loading a font. Especially if you use it only in a few headings on your website.
Here are examples of a page speed score with 5 and one google font used in theme:

1.3. Use self-hosted fonts instead of google fonts.
In some cases, the best option would to be disable google fonts (Athete2 / Theme Appearance / General: Enable Google Font) and set fonts in .less. This will require editing theme files thought, to override default Magento fonts. Check this instructions to learn how to do it: How to add custom fonts in Magento 2.
Please note that this method is pretty hassle and doesn’t guarantee that you will get better scores. If you are not familiar with less, then I would suggest to simply minimize the amount of google fonts used.
First example below demonstrate score with 5 google fonts and second 5 self-hosted fonts. (Tests were made with css-only gallery on product page)

You can easily have 100 score with Athlete 2 on desktop even with 5 google fonts. The problem we are straying to solve in this article is mobile scores. So my recommendation is to keep using multiple fonts on desktop but load only 2-3 on mobile. How to do it is also described in this post: How to add custom fonts in Magento 2.
Example below demonstrate page speed score with only 2 google fonts used on mobile theme. (Tests were made with css-only gallery on product page)
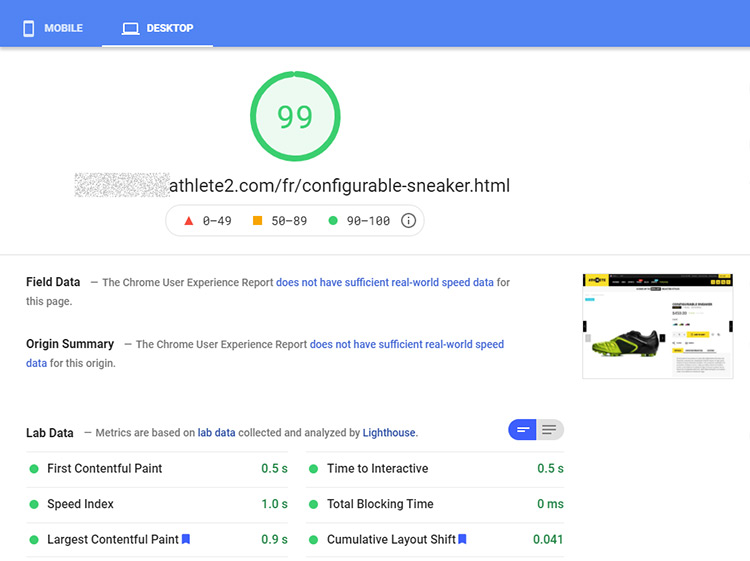
Example below demonstrate page speed score on desktop with 5 self hosted fonts. As you can see, unlike on mobile, they do not have impact on page speed much on desktop. So feel free to use as multiple fonts on desktop.
2. Setup Athlete2 mobile theme
We’ve added mobile theme in version 1.7 of Athlete 2 Magento 2 theme. Basically, it is Athlete2 child theme which allows to disable some functionality and css, which is used on desktop only. Do not expect mobile theme to improve your page speed score out of the box ( it can though). Its main purpose is to enable mobile-related settings in Athlete 2 Theme.
Check this post to learn how to install and enable athlete 2 mobile theme.
Important: You need to enable inline dynamic css if you are using mobile theme, so you get different dynamic css generated for desktop and mobile. ( Athete2 / Theme Appearance / Custom Css : Save Custom Css Inline )
Also, if you use Varnish cache, then you need to setup separate cache for mobile devices: https://www.scommerce-mage.com/blog/magento-2-varnish-device-detection.html
3. 3rd party modules, scripts and other libraries
3.1 Use less 3rd party extensions and js libraries.
To improve page speed score we need to remove render blocking elements and make content which google considered most important to load first. Basically, render blocking elements is amount of js and css which is loaded during the initial page load. That is why you can see the same recommendation all over the internet is to use less 3rd party extension and libraries.
Each 3rd party extension adds its own assets like css and js. Sometimes you install 3rd party extension which comes with a slider but there is already a slider in a theme and probably there is another slider in another extension, so you end up having multiple sliders on your website and each of them have usually pretty big js and css.
Do not use heavy Extensions like Page/Slider builders
In addition to said above, you should decide what is more important for you: website speed or ease to set up the content. If you need to make something fast or you don’t have a specific knowledge to create content without use of page builders or revolution slider (or similar extensions which allows to builder content without touching a code) then you can use them. This is why they are created. But if you care about page speed then you should try to avoid page/slider builders. Such extensions are very heavy, adds tons of dom elements, useless code and assets.
Does it means that you should immediately stop using such extensions? Not really. Not using it at all is usually a best choice but not everyone can afford it. You should at least stop it using on the pages where you care about page speed. I want to remind that you get different score on each page. Some pages can be created for search engines and some for people, with use of some fancy, eye-catching content (which for example Revolution slider allows to create). Try to find a balance. Keep in mind however that if you install Revolution slider it will add a lot of css on all pages, not only where you use it.
3.2 Disable Magento 2 Page builder
You should definitely disable Magento Page Builder if you care about page speed. Using Magneto Page Builder is like adding a second theme to your website. It adds a lot of css and js which you will not use on every page of your website, including css for slick slider, page builder elements, etc. Vimeo player js(60kb), parallax js(40kb) and so on. Not saying about the page where you added content via page builder. Just inspect page on your website and search for Magento_PageBuilder. So if you are looking at removing unused CSS then you should start from removing page builder.
Run following command to disable Magento Page Builder:
bin/magento mo:d Magento_CatalogPageBuilderAnalytics Magento_PageBuilderAnalytics Magento_CmsPageBuilderAnalytics Magento_PageBuilder --clear-static-contentDon’t forget to redeploy content:
php bin/rm -rf ./pub/static/*
rm -rf ./var/{cache,page_cache,view_preprocessed}
php bin/magento setup:di:compile
php bin/magento setup:static-content:deploy -f
3.3 Analytics, Share buttons and other External js
Analytics, including google analytics scripts and other external scripts that you add to your website via cdn can destroy page speed score. Especially if you add multiple analytics scripts to your page.
The Google Analytics code delay is pretty long, it is like loading Google Fonts or a Font Awesome. While we can easily strip such features as FontAwesome, not adding Google Analytics is a serious consideration.
At least use latest scripts for Google Analytics: https://developers.google.com/analytics/devguides/collection/upgrade
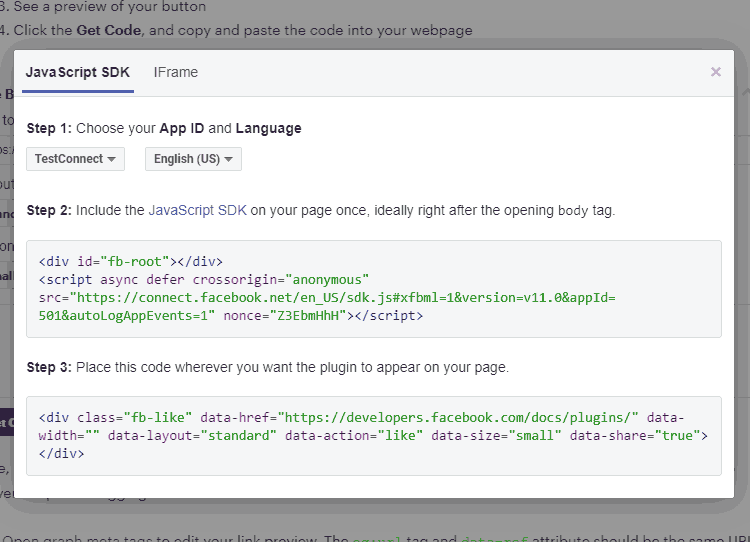
and regenerate Facebook like button code to get the latest version with async, if you use it of course. Use JavaScript SDK code instead of IFrame for Facebook like button as shown on image below.
4. Additional optimization (Advanced)
Below optimization can win you couple points (or not) but require understanding of Magento and if used incorrectly can break your store functionality. So use it wisely.
4.1 Disable Magento default extensions that you don’t need.
Feel free to disable following extensions if you are not using any of them. This may not improve your page speed score but should make Magento a bit lighter.
Magento_Csp
Magento_Fedex
Magento_Ups
Magento_Usps
Magento_AwsS3
Amazon_Core
Amazon_Login
Amazon_Payment
Dotdigitalgroup_Email
Dotdigitalgroup_Chat
Dotdigitalgroup_Sms
Klarna_Core
Klarna_Ordermanagement
Klarna_Kp
Klarna_Onsitemessaging
Klarna_KpGraphQl
PayPal_Braintree
PayPal_BraintreeGraphQl
Vertex_Tax
Vertex_AddressValidationApi
Vertex_AddressValidation
Yotpo_Yotpo
In case you are not familiar with some of these extensions:
Magento_Csp – content security policy which is currently useless in Magento.
Magento_AwsS3 – Amazone storage service, you probably know if you are using it, otherwise feel free to disable it. https://devdocs.magento.com/guides/v2.4/config-guide/remote-storage/config-remote-storage-aws-s3.html
Dotdigitalgroup – paid marketing tools https://www.dotdigitalgroup.com/, https://docs.magento.com/user-guide/configuration/dotdigital.html
Klarna – service that allows customers to pay later https://www.klarna.com/us/, https://docs.magento.com/user-guide/payment/klarna-setup.html
Vertex – https://docs.magento.com/user-guide/tax/vertex-configure-magento.html
Yotpo_Yotpo – reviews and ratings paid service https://www.yotpo.com/, https://docs.magento.com/user-guide/marketing/yotpo-features.html
4.2 Remove Magento js that you don’t need
Magento load a lot of js on front page and some of them are never used.
Download sources for your version of Magento: https://github.com/magento/magento2/releases
Copy bootstrap.js from app/code/Magento/Ui/view/base/web/js/lib/knockout/bindings/
and place it in following folder in your theme (you will need to create it): Magento_Ui\web\js\lib\knockout\bindings
In Athlete2 theme it will be: app\design\frontend\Olegnax\athlete2\Magento_Ui\web\js\lib\knockout\bindings
Open copied bootstrap.js and remove following lines from it:
range:          require('./range'),
...
datepicker:     require('./datepicker'),
...
colorPicker:    require('./color-picker')
This will remove some range slider which we never seen, datapicker (don’t remove it if you have it somewhere on your website) and a color picker (no idea where you may need a color picker on frontend).
Additionally check following patches to see what files you need to edit to remove effect-blind, effect-fade js, and inline translation js (that you definitely don’t need in production): https://github.com/vasilii-b/magento2-frontend-improvements
4.3 Remove some unused css
You will not be able to remove all of the unused css but you can remove some this you are not using for sure. You can remove/comment out following lines in app\design\frontend\Olegnax\athlete2\web\css\source\_sources.less in case you don’t use Magefan Blog or Olegnax Instagram extensions:
@import '_blog.less';
@import '_instagram.less';
5. New General Theme Settings
Disable unused js/features – you can disable some feature in theme which you don’t use.
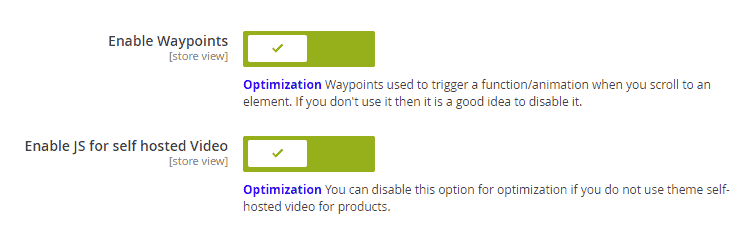
Waypoints – this allows to show/animate content when it is became visible.
For example you can see how green line animated below the “SHOP BY & CATEGORY” title on this page of Athlete2 theme demo: https://athlete2.com/index.php/br/athlete2-home-v3-brazil
Enable JS for self hosted Video – this options is for self-hosted videos in product gallery or on product listing. It adds additional js to control video. So if you don’t have video in your products then you don’t need to load this extra js.
Disable sticky header in Mobile Theme
You can disable sticky header for mobile theme by enabling following option: Athete2 / Theme Settings / Header : Sticky Header : Disable sticky header in Mobile Theme. In this case sticky header js will not be loaded on mobile.
5.1. Lazy Load
We have reworked lazy load (Athete2 / Theme Settings / General : Lazy load) in version 1.7 of Athlete 2 Magento 2 theme to get the best results possible. It no longer depends on jquery and uses Intersection Observer, so it is much faster. If you are using 3rd party extension for lazy load I suggest to test it with theme built in lazy load. We’ve also added svg placeholders for images as an alternative to image placeholders feature (Athete2 / Theme Settings / General : Generate SVG Placeholder). Try both to check what works best for you.
6. Other general recommendations
Below are some basic steps which was already described in full list of recommendations above, in case you missed it:
- Follow basic optimization recommendations: Enabled Cache, JS & CSS minify and merge, Enable Production mode, etc. https://olegnax.com/magento-2-speed-optimization-guide/
- Use Varnish and/or other server-side cache. Impact: Low on page speed scores but can be very high on actual website load time. Varnish setup: https://olegnax.com/speed-up-magento-2-with-varnish-and-nginx-as-ssl-termination-on-ubuntu/
- Separate Varnish cache for mobile and desktop theme: https://www.scommerce-mage.com/blog/magento-2-varnish-device-detection.html
- Choose proper hosting.
Product page
We have added couple of options for product page that can help you improve page speed metrics. Try them out after general optimization.
Keep in mind that you need to load top part of the product page fast, so do not add any heavy content there for mobile. If you are going to add lets say a big banner before the product gallery, then it will became your largest content and below optimization will not work. Following options are useful if gallery is the first content on your product page as shown on image below.
Preload first product image on product page.
You need to load largest visible content as soon as possible to get lower LCP value. On a product page it is usually a product image, unless you’ve added some content above the product image and description. So if it is a product image on your website, then you can try enabling this option to preload first product image. Note that overuse of preload can make it only worse. If you do not preload anything else then this option may improve LCP.
Replace Fotorama with CSS-Only gallery in Mobile Theme
Again, you need to get product image loaded and visible as soon as possible, so replacing heavy Magento Fotorama with alternative will make a noticeable improvement in page speed. You can enable css-only gallery on mobile in Athlete2 / Theme Settings/ Product Page / Replace Fotorama with CSS-Only gallery in Mobile Theme. This option require athlete2 mobile theme to be installed. CSS-only gallery on mobile can also be enabled for grid gallery layouts.

Below are examples with Fotorama gallery on mobile and replaced with css-only gallery.
Below is what we get with Fotorama on desktop. As you can see there are no problems with it on desktop, so we added option to replace with css-only version for mobile only.
Home and other cms pages
I will not repeat the same general information about optimization that you can find all over the internet about web vitals, you can read it yourself: https://web.dev/learn-web-vitals/#web-vitals-metrics
Speaking rough, none tech language, you need to make first visible part of your website to visible and loaded as fast as possible. This means you need to remove css and js which loads before your largest content (LCP). On product page it is usually product image, on cms page it is usually a big banner image (but it is not necessarily an image). And also make this image to be loaded as fast as possible. When I say remove, it means either remove not used css/js or load it after website is loaded, so it doesn’t affect page speed. Moving css/js and loading main image faster will affect two most important metrics: Largest Contentful Paint (LCP) and Total Blocking Time.
Do not use heavy sliders, animated gifs or video as your first content in the page
If largest image(LCP) is in slider then it will not be loaded and visible until slider is loaded. This cause huge delay and grows time for most important metric: LCP, which singlehandedly destroy page speed score. This is why we have added css-only version to Olegnax Carousel slider for mobile theme. So our main recommendation, if you want to get high page speed score is to either use css-only version for slider or do not use slider for your first and largest block of content (LCP) on the page at all.
Optimize your images
This is a general optimization but I will remind about it here. Your first and largest image should also have smaller size possible. Use “Save for web” in Photoshop or online services like https://tinyjpg.com/ and https://tinypng.com/ to compress your images.
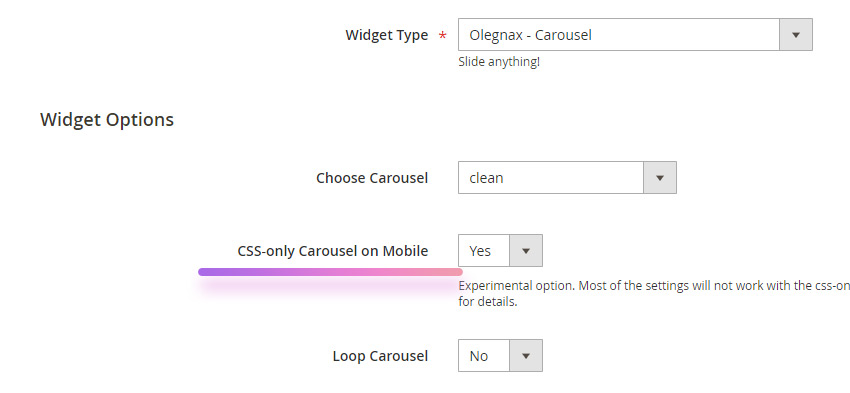
Enable CSS-only carousel
Edit your Olegnax Carousel widget options and enable CSS-only Carousel on Mobile (css_only=”1″). This option require mobile theme.
After enabling css-only carousel you can have lower scores than with carousel slider. This can happen because your image is now loaded after some other content.
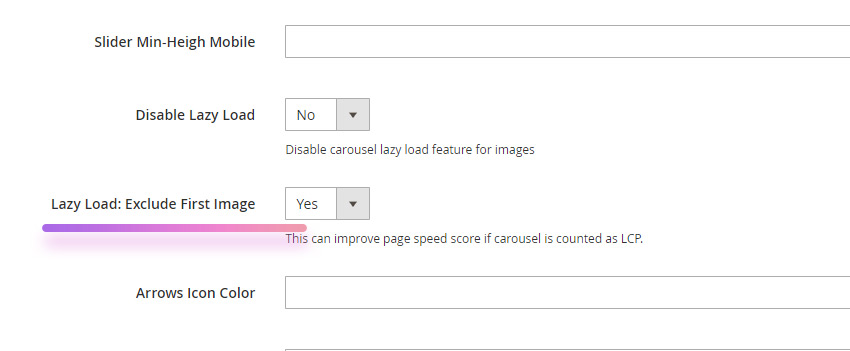
You need to put your image first in a queue. You can do this by excluding image from lazy load and also preloading this image.
Exclude main image from lazy load.
Lazy load script should be loaded and executed before it will load an image. This adds a delay. It is ok for other images but not for the first image which is your LCP.
You add data-ox-image attribute to img tag to exclude it from Athlete2 theme lazy load. E.g.:
<img src="image.jpg" data-ox-image>To exclude first image in Olegnax Carousel use “Lazy Load: Exclude First Image” option in widget ( lazy_exclude_first=”1″ ):
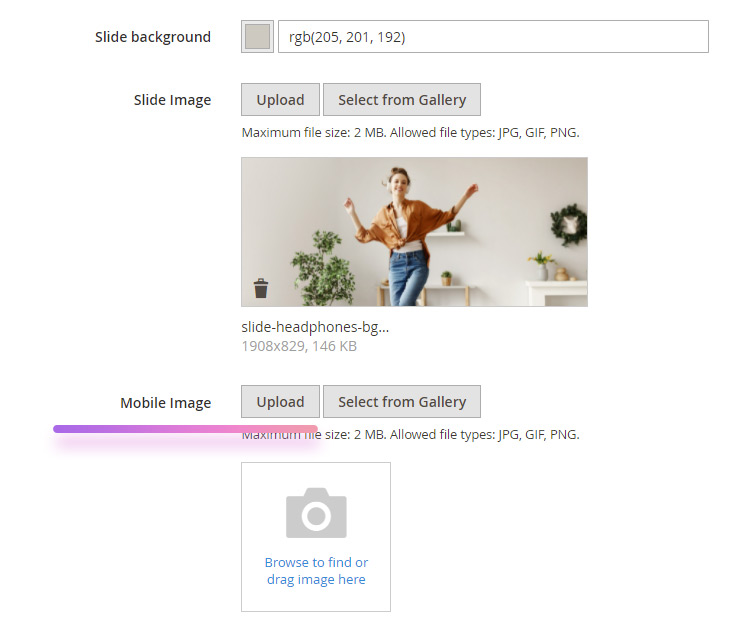
Separate images for mobile
You can load smaller images on mobile both in page content and in Olegnax Carousel slider. But most likely this will not improve your metrics. yeah.
You can add separate image for mobile using an option Olegnax Carousel slider. Open to edit your slide in Olegnax / Carousel : Slide and upload Mobile Image
Preload image
You can also preload your image but it will only work if you use css-only slider or do not use sliders at all for your main image e.g.: simple hero header with image. There is no point in preload if image is in js slider because you will have to wait until slider is loaded.
Preload image can give you a big boost or make it worst, if you have too many preloads (usually fonts are preloaded) on the page. Use it carefully.
How to preload image on specific page in Magento 2
To preload image you need to add following line to the head tag of your page.
<link rel="preload" as="image" href="path-to-your-image-here">E.g.:
<link rel="preload" as="image" href="https://athlete2.com/media/wysiwyg/banner.jpg">Now to add this line to the head tag of a specific page (I suppose you are using Magento version above 2.3.4) you will have to create custom layout update via xml: https://olegnax.com/documentation/magento-2/how-to-add-custom-layout-update-in-magento-2-3-4/
You can’t add image link to head in Magento 2, at least for now, so you have to add it to the .phtml template first and then call this template in xml. Yeah a bit of hassle.
1. Create some .phtml template with your image preload as content (replace path-to-your-image-here with absolute path to your image as on example above):
<link rel="preload" as="image" href="path-to-your-image-here">
We will call it home-image-preload.phtml in our example just to know what it is for. Place it in app/design/frontend/Olegnax/athlete2/Olegnax_Athlete2/templates. It is a good idea to create a folder and place templates there if you plan to add preloads for many pages. E.g.: app/design/frontend/Olegnax/athlete2/Olegnax_Athlete2/templates/image_preloads
2. Create xml file with following code and call your .phtml template there:
<page xmlns:xsi="http://www.w3.org/2001/XMLSchema-instance" xsi:noNamespaceSchemaLocation="urn:magento:framework:View/Layout/etc/page_configuration.xsd">
    <body>
        <referenceBlock name="head.additional">
            <block name="athlete2_home_image_preload" class="Olegnax\Athlete2\Block\Template" template="image_preloads/home-image-preload.phtml" before="-"/>
        </referenceBlock>
    </body>
</page>
name="athlete2_home_image_preload" – this can be anything. You just need a unique name for your block.
Note that I’ve added image_preloads/ folder in path to the home-image-preload.phtml in xml code, remove it if you placed template directly to app/design/frontend/Olegnax/athlete2/Olegnax_Athlete2/templates
3. Call our xml cms_page_view_selectable_page_ImagePreload.xml and replace “page” with your page url key. You can check it in Search Engine Optimization section when you edit page:
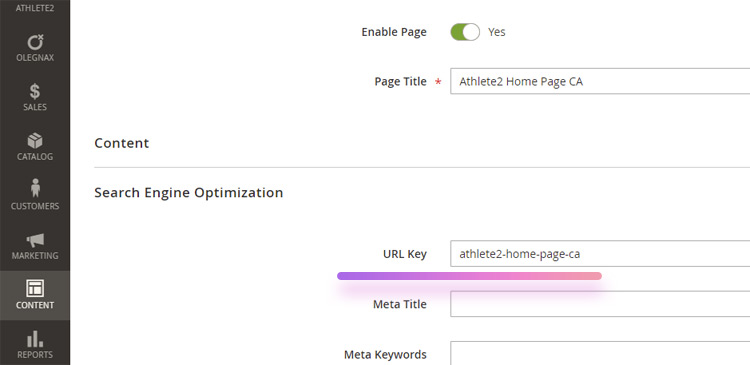
So in our example file should be called like this:
cms_page_view_selectable_athlete2-home-page-ca_ImagePreload.xml
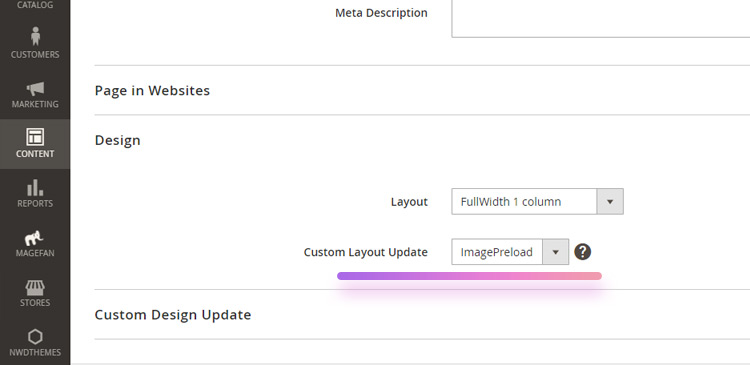
ImagePreload – is how it will be called in Custom Layout Update select in admin panel. So call it the way you can understand what it is for.
4. Place it in app/design/frontend/Olegnax/athlete2/Olegnax_Athlete2/layout
5. Clear cache and choose ImagePreload for Custom Layout Update option in Design section of your home page.
You can download sample files to preload image on cms page below. Extract it in your theme folder (e.g.: app/design/frontend/Olegnax/athlete2 ) and change image url in a2_preload.phtml and athlete2-page in cms_page_view_selectable_athlete2-page_ImagePreloadAthlete2.xml file name with your page url key.
How to preload image on home page in Magento 2
You can’t add image preload for the home page using Custom Layout Update as described above. You will need to add xml code which calls your .phtml file in cms_index_index.xml instead. Location is the same: app/design/frontend/Olegnax/athlete2/Olegnax_Athlete2/layout . And that is all, you don’t need to select it anywhere.
So you repeat steps 1 and 2 from instructions above but adding xml code to cms_index_index.xml
You can download sample files to preload image on home page below. Extract it in your theme folder (e.g.: app/design/frontend/Olegnax/athlete2 ) and don’t forget to change image url in ca_home_preload.phtml
CMS Page Score Improvements Examples
1. Original page. Olegnax Carousel slider (based on owl carousel) is used.

2. Optimized for better metrics.
- Olegnax Carousel slider with CSS-only version enabled for mobile.
- Disabled lazy load for first image in slider.
- Added preload for first image in slider.
As you can see on example, removing owl carousel slider decreased LCP time by almost three times, from 9 sec to around 3.
Create separate home page for mobile
You can not only set separate images for mobile but actually load different home page for mobile, if you have installed a mobile theme. So you can still use heavy sliders and have massive content on desktop.
To do this you will need to add content via cms block using widgets but for specific theme. Basically we already described how to add cms block using widgets in this post: How To Use/Insert Widgets In Magento 2
- You need to create CMS block in Content > Block and move (copy/paste) your home page content there. Call this block something like “Home page desktop content”, just so you know what it is for.
- Now you can remove content from your home page. Leave it empty or you will have a duplicate content.
- Create another CMS block in Content > Block and place content for mobile there. And call this block something like “Home page mobile content”.
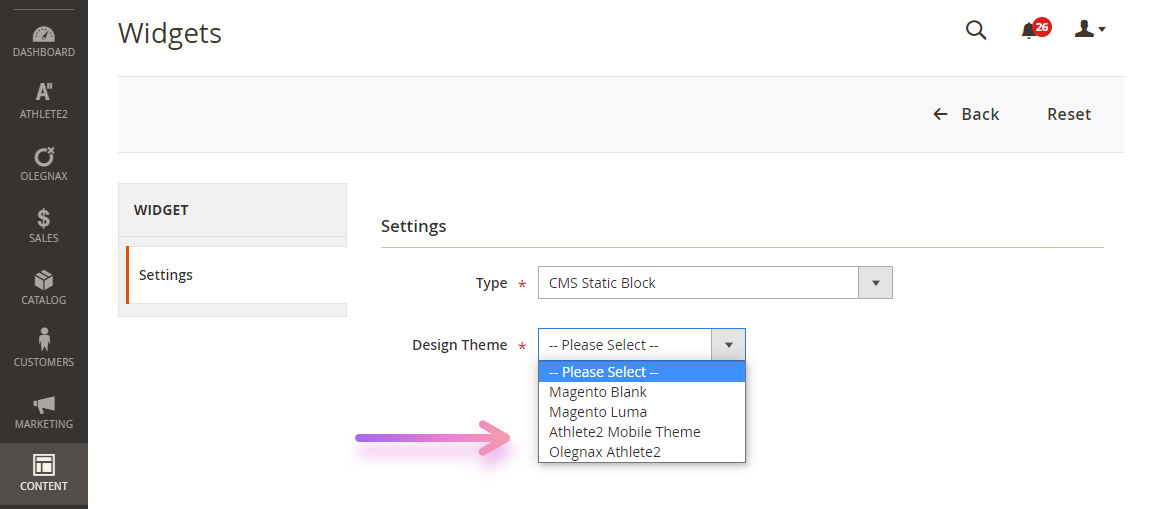
- Create a new widget via Content > Widget and choose Type: CMS Static Block.
- Now the trick part is Design Theme option. Choose your desktop theme e.g. Olegnax Athlete2. Note that if you have a child theme, then you need to choose a child theme, e.g.: Athlete2 Child Theme.
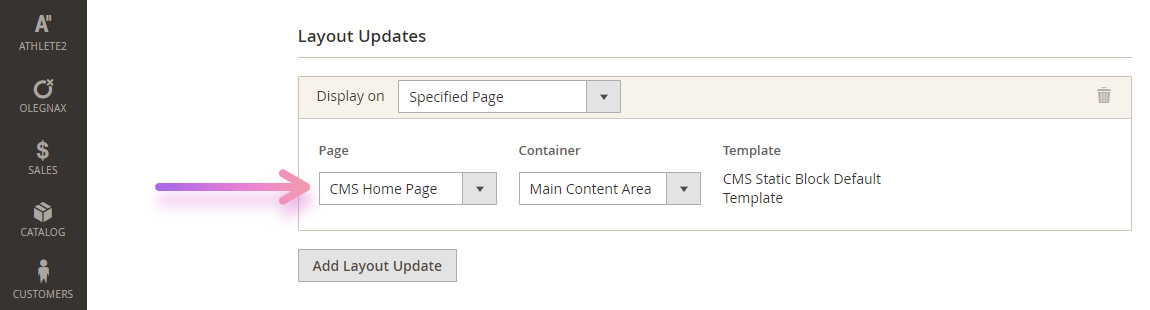
6. For Layout Update choose Specified Page, Page: CMS Home Page, Container: Main Content Area.
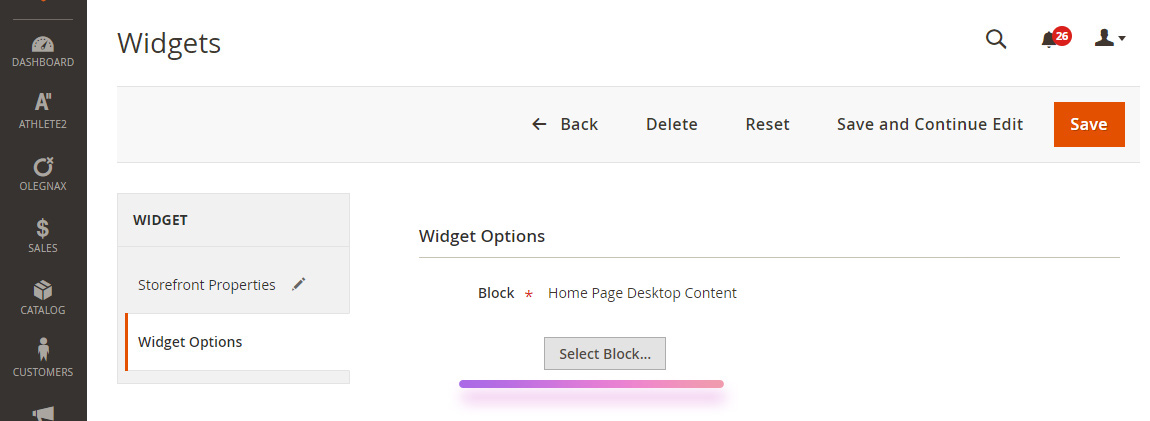
7. Now choose (in Widget Options) your home page static block that we created for desktop.
8. Now you need to do the same but for mobile content.
8.1 Create a new widget but now choose your mobile theme, e.g.: Athlete2 Mobile Theme in Design Theme select. Note that if you have a child theme for mobile theme then you need to choose your mobile child theme.
8.2 Choose Specified Page, Page: CMS Home Page, Container: Main Content Area for widget Layout Update
8.3 Finally choose your home page static block that we created for mobile.
That’s it. Now you have two widgets which adds two different cms blocks to main content of your home page. One widget will add cms block for Athlete2 theme and another for Athlete2 Mobile Theme.
Final tests and conclusion
Below are some examples of page speed scores that we get both for desktop and mobile using version 1.7 of Athlete2 theme. These score were achieved by using Athlete2 theme settings and mobile theme described in this article. But also we’ve created separate child themes for each demo with some manual optimizations such as: self-hosted google fonts separately for desktop and mobile, added preload image for carousel slider on Spain and Canada demos.
Note that scores may be changed over time since google page speed insight requirements are constantly changing, also our demos are not fully optimized for page speed. Our main aim is still to demonstrate various designs and features and not to squeeze out maximum page speed points.
Both Canada and Spain product pages have grid gallery on desktop but Canada demo demonstrates owl carousel for product gallery on mobile, while Spain has css-only gallery enabled on mobile.

However, as you may notice not all of our demos have great page speed results. This is because not all of our demos/pages are for demonstration of a page speed scores. Some of them features Revolution slider, FontAwesome and other 3rd parties which can drastically affect page speed but in return allows to create complicated content without technical knowledges.
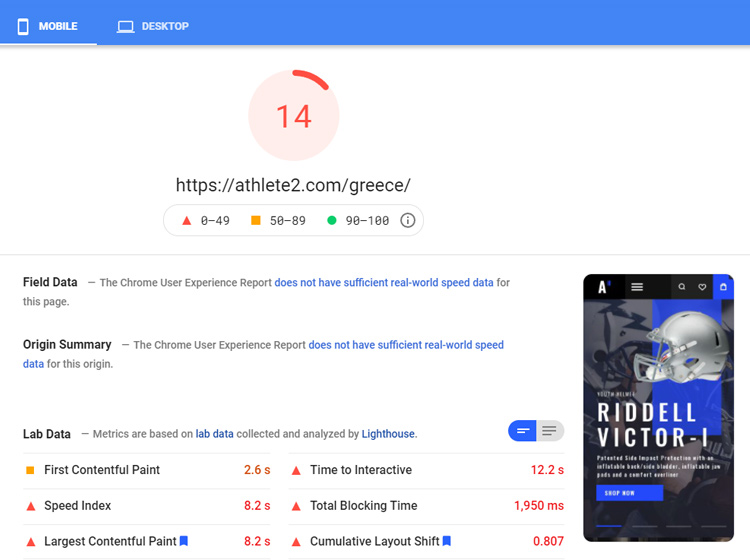
For example “Greece” demo home page features a lot of heavy content and Revolution slider is a Largest Contentful Paint (LCP). As a result we have huge timings and delay and so ruined page speed scores:
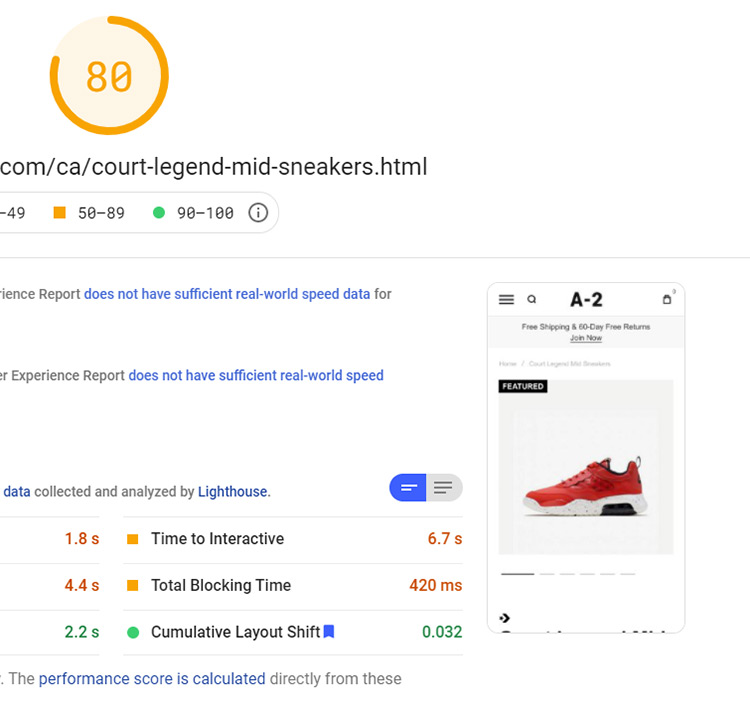
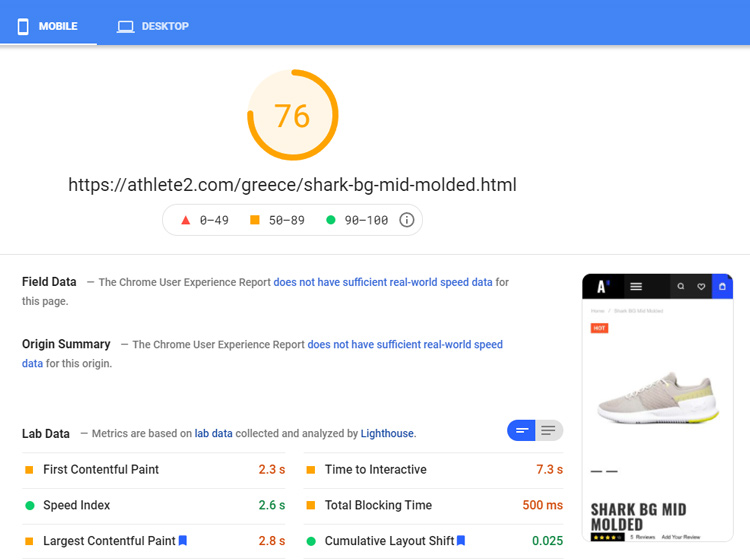
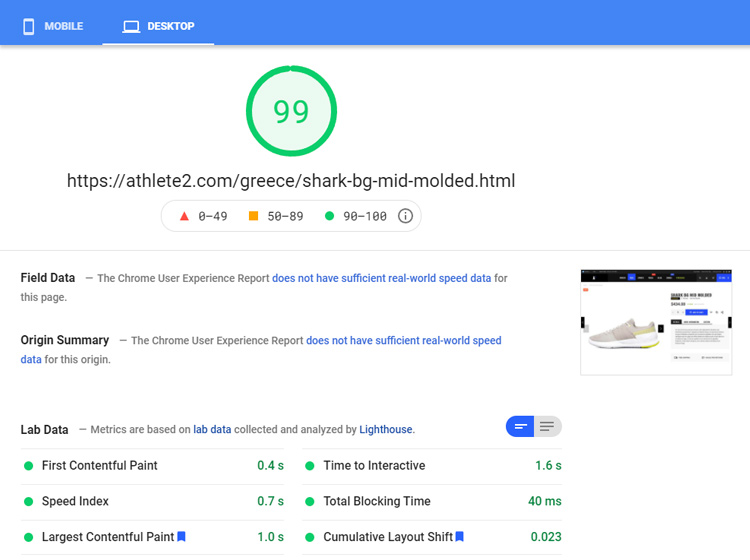
While product page on “Greece” demo shows good results (with css-only gallery instead of fotorama):
Once again, don’t be obsessed with page speed scores. You don’t have to optimize all of the pages on your website. You can make some pages for SEO and some for people(e.g. where you bring people via ads/social networks). It is not only google bots visiting your website after all and not all people come from search engines.
I hope this article will shed some light on google page speed scores and help you improve it for your store.