


We strongly recommend to do all changes in a child theme. So all examples below will be for a child theme called athlete2_child.
You can learn how to create a child theme in Magento 2 and download sample child theme for athlete 2 in this article: https://olegnax.com/documentation/magento-2/how-to-create-a-child-theme-in-magento-2/
How to remove Magento 2 default font
The first thing you probably want to do, if you plan to use custom fonts, is remove fonts that you don’t need. This can be also useful is you are using google fonts in your theme.
1. Open edit _typography.less in your theme with any text editor. Default path to file with fonts declaration is following:
app/design/frontend/<your_vendor_name>/<your_theme_name>/web/css/source/_typography.less
In Athlete2 theme it is:
app/design/frontend/Olegnax/athlete2/web/css/source/_typography.less
Proper way is to copy original _typography.less to a child theme and make edits to this file in a child theme.
Let’s say you called your child theme athlete2_child. So you need to copy original _typography.less from theme folder app/design/frontend/Olegnax/athlete2/web/css/source/ to your child theme app/design/frontend/Olegnax/athlete2_child/web/css/source/
Remove all .lib-font-face records from _typography.less, e.g.:
    .lib-font-face(
        @family-name: @font-family-name__base,
        @font-path: '@{baseDir}fonts/opensans/light/opensans-300',
        @font-weight: @font-weight__light,
        @font-style: normal,
        @font-display: swap
    );
2. Now create default_head_blocks.xml file with following code:
<page xmlns:xsi="http://www.w3.org/2001/XMLSchema-instance" xsi:noNamespaceSchemaLocation="urn:magento:framework:View/Layout/etc/page_configuration.xsd">
    <head>
        <remove src="fonts/opensans/light/opensans-300.woff2"/>
        <remove src="fonts/opensans/regular/opensans-400.woff2"/>
        <remove src="fonts/opensans/semibold/opensans-600.woff2"/>
        <remove src="fonts/opensans/bold/opensans-700.woff2"/>
    </head>
</page>
and place it in Magento_Theme/layout folder of your child theme. Full path fill be:
app/design/frontend/Olegnax/athlete2_child/Magento_Theme/layout
That’s it. Now Magento default font will not be loaded.
You can download child theme with removed Magento default fonts below.
How to add custom font in Magento 2
1. Upload your font files to the fonts folder:
app/design/frontend/<your_vendor_name>/<your_theme_name>/web/fonts
In Athlete2 theme path is following:
app/design/frontend/Olegnax/athlete2/web/fonts
(Note that we already added latin-only versions of the fonts used in demos to Athlee2 theme in .woff2 format.)
For our child theme it will be:
app/design/frontend/Olegnax/athlete2_child/web/fonts
In Magento each font weight is placed in separate folder. This is not a mandatory but we will follow same structure. Lets say you are adding Roboto font in with 400, 500 and 700 font weights. Your files and folder inside of the “fonts” folder should look like this:
- roboto/regular/roboto-400.woff2
- roboto/medium/roboto-500.woff2
- roboto/bold/roboto-700.woff2
Folder name recommendations for each font weight: 400 – regular, 500 – medium, 600 – semibold, 700 – bold, 800 – extrabold, 900 – black.
2. After we uploaded font files we need to call them in CSS. You can declare custom font using .lib-font-face in app/design/frontend/<your_vendor_name>/<your_theme_name>/web/css/source/_typography.less
Copy _typography.less file from theme folder app/design/frontend/Olegnax/athlete2/web/css/source/ to your child theme e.g.: app/design/frontend/Olegnax/athlete2_child/web/css/source/.
Note that you should already have this file in a child theme if you removed default Magento fonts in first step.
Add following code inside of the & when (@media-common = true) {
.lib-font-face(
    @family-name:'<custom_font_name>',
    @font-path: '@{baseDir}fonts/<path_to_font_file>',
    @font-weight: <font_weight>,
    @font-style: <font_style>,
    @font-display: <auto|block|fallback|optional|swap>
);
<custom_font_name> – this is the name of your font which used in css. This is the name that you will use to set font for various text/headings on your website. E.g. ‘Roboto’, ‘Roboto Condensed’, ‘Open Sans’, and so on.
@{baseDir}fonts/<path_to_font_file> – this is a path to your font files. Base dir is a web folder in your theme folder. We placed fonts in separate folders for each font weight inside of the “fonts” folder. So the path for regular font weight will be @{baseDir}/fonts/roboto/regular/roboto-400.woff2
For bold font it will be: @{baseDir}/fonts/roboto/bold/roboto-700.woff2 (note the changes marked in bold).
<font_weight> – we need to add font face for each font weight and this is where we define its weight. For regular font it will 400, for bold 700 and so on. You can either type 400 or use theme variables. You can find them in app\design\frontend\Olegnax\athlete2\web\css\source\_theme.less in athlete2 theme:
@font-weight__light: 300;
@font-weight__regular: 400;
@font-weight__medium: 500;
@font-weight__semibold: 600;
@font-weight__bold: 700;
@font-weight__black: 800;
@font-weight__extra: 900;
Set @font_style as normal and @font-display as swap unless you know what it is for.
With all said above, this is how lib-font-face for Roboto font with regular font weight should look:
    .lib-font-face(
        @family-name: 'Roboto',
        @font-path: '@{baseDir}fonts/roboto/regular/roboto-400',
        @font-weight: @font-weight__regular,
        @font-style: normal,
        @font-display: swap
    );
and another example for bold font weight:
    .lib-font-face(
        @family-name: 'Roboto',
        @font-path: '@{baseDir}fonts/opensans/bold/opensans-700',
        @font-weight: @font-weight__bold,
        @font-style: normal,
        @font-display: swap
    );
So for font with 3 font weight we should add .lib-font-face 3 times and with path’s to each font weight in “fonts” folder.
3. Optionally. Finally add font nodes with path to your fonts in <head> tag of …/Magento_Theme/layout/default_head_blocks.xml of your theme folder.
Full path in our child theme will be as follow:
app/design/frontend/Olegnax/athlete2_child/Magento_Theme/layout/default_head_blocks.xml
<page xmlns:xsi="http://www.w3.org/2001/XMLSchema-instance" xsi:noNamespaceSchemaLocation="urn:magento:framework:View/Layout/etc/page_configuration.xsd">
    <head>
        <font src="fonts/roboto/regular/roboto-400.woff2"/>
        <font src="fonts/roboto/medium/roboto-500.woff2"/>
        <font src="fonts/roboto/bold/roboto-700.woff2"/>
    </head>
</page>
Add as many fonts and font weights as you need the same way. This will add link in page head with preload. Do not add this for all of your fonts if you have many fonts, only for those that are part of LCP (fonts that visible at the top part of your website pages) or don’t add at all if you have other preloads on website.
With removed default Magento fonts file will look like this:
<page xmlns:xsi="http://www.w3.org/2001/XMLSchema-instance" xsi:noNamespaceSchemaLocation="urn:magento:framework:View/Layout/etc/page_configuration.xsd">
    <head>
        <remove src="fonts/opensans/light/opensans-300.woff2"/>
        <remove src="fonts/opensans/regular/opensans-400.woff2"/>
        <remove src="fonts/opensans/semibold/opensans-600.woff2"/>
        <remove src="fonts/opensans/bold/opensans-700.woff2"/>
        <font src="fonts/roboto/regular/roboto-400.woff2"/>
        <font src="fonts/roboto/medium/roboto-500.woff2"/>
        <font src="fonts/roboto/bold/roboto-700.woff2"/>
    </head>
</page>
Important: if you added a child theme for Athlete2 theme and want to use Athlete2 mobile theme, then you need to set your child theme as parent in Athlete2 mobile theme.
To do this open theme.xml in athlete2 mobile theme and change “parent” value from athlete2to your child theme name, e.g.: Olegnax/athlete2_child
Download Examples
We’ve prepared complete child themes with replaced fonts for each of Athlete 2 theme demos. So you can simply install child theme to load the same fonts as on our demos as self-hosted instead of google fonts.
CanadaSpainAustraliaGreeceUnited States
Disable Google fonts in Athlete2 Theme
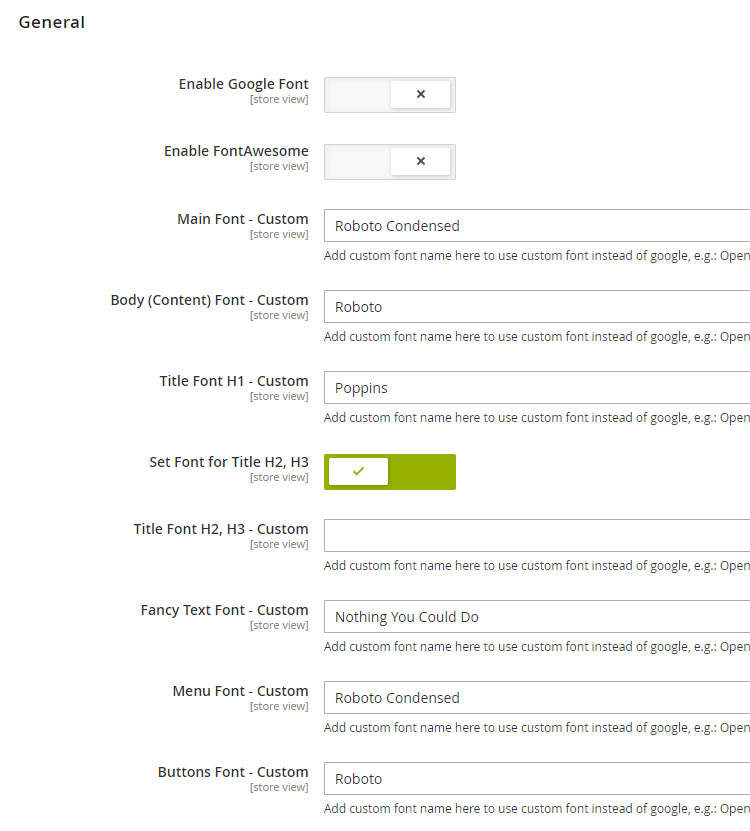
If you plan to use custom fonts then you probably want to disable google fonts. Nagivate to Athlete2 / Theme Appearance / General and switch off “Enable Google Font” option.

Use custom font in Athlete 2 Theme
Now, after we added new fonts, we need to apply them to various headings in theme. To do this open Athlete2 / Theme Appearance/ General and added your font names for font settings with “- custom” postfix. This where we use font name that we set in .lib-font-face before (e.g.: @family-name: ‘Roboto’).
You can also set font name in less files by changing variables in _theme.less.
By default main theme font is set as “Open Sans” (default magento font): @main-font: 'Open Sans', @font-family__sans-serif;
You can, for example, change it to “Roboto”: @main-font: 'Roboto', @font-family__sans-serif;
Add different custom fonts for Athlete 2 mobile theme
If you have many fonts on desktop (which is ok), then it is a good idea to shave off some of them for mobile, to make your website load faster on mobile devices.
The process is basically the same as described above in How to remove Magento 2 default font but this time we will remove some of the fonts we added on desktop.
Please note, that this method is only possible if you replaced google fonts with custom fonts as described in How to add custom font section above.
We will show example for Canada demo, which have 5 fonts. And will leave only 2 on mobile.
First copy _typography.less file from theme child folder (where we defined our custom fonts) app/design/frontend/Olegnax/athlete2_child/web/css/source/ to your mobile child theme e.g.: app/design/frontend/Olegnax/a2m_child/web/css/source/.
Yes, you need to create another child theme, for mobile theme this time. You can of course make changes directly in mobile theme but this is very bad practice. So we suggest to have 4 themes: Athlete2 theme, Athlete 2 child theme, Athlete 2 mobile theme and Athlete 2 mobile child theme.
Open it and leave only following lib-font-face declarations:
.lib-font-face(
    @family-name: @font-family-name__base,
    @font-path: '@{baseDir}fonts/roboto/regular/roboto-400',
    @font-weight: @font-weight__regular,
    @font-style: normal,
    @font-display: swap
);

.lib-font-face(
    @family-name: @font-family-name__base,
    @font-path: '@{baseDir}fonts/roboto/medium/roboto-500',
    @font-weight: @font-weight__medium,
    @font-style: normal,
    @font-display: swap
);

.lib-font-face(
    @family-name: @font-family-name__base,
    @font-path: '@{baseDir}fonts/roboto/bold/roboto-700',
    @font-weight: @font-weight__bold,
    @font-style: normal,
    @font-display: swap
);
.lib-font-face(
    @family-name: @font-family-name__base,
    @font-path: '@{baseDir}fonts/roboto/extrabold/roboto-900',
    @font-weight: @font-weight__extra,
    @font-style: normal,
    @font-display: swap
);
.lib-font-face(
    @family-name: 'Nothing You Could Do',
    @font-path: '@{baseDir}fonts/nothing-you-could-do/regular/nothing-you-could-do-400',
    @font-weight: @font-weight__regular,
    @font-style: normal,
    @font-display: swap
);
Now create default_head_blocks.xml files in Magento_Theme/layout folder of your mobile child theme. E.g.:
app/design/frontend/Olegnax/a2m_child/Magento_Theme/layout/default_head_blocks.xml
Copy “font” node that you added in the same file in your child theme, for font that you want to remove and rename them to “remove”. E.g.:
<font src=”fonts/roboto-condensed/bold/roboto-condensed-700.woff2″/> to <remove src=”fonts/roboto-condensed/bold/roboto-condensed-700.woff2″/>
We will remove Roboto Condensed and Poppins on mobile for Canada demo. There will be not much difference without them on mobile as for me. So the final default_head_blocks.xml file should look like this:
<page xmlns:xsi="http://www.w3.org/2001/XMLSchema-instance" xsi:noNamespaceSchemaLocation="urn:magento:framework:View/Layout/etc/page_configuration.xsd">
    <head>
        <remove src="fonts/roboto-condensed/bold/roboto-condensed-700.woff2"/>
        <remove src="fonts/roboto-condensed/regular/roboto-condensed-400.woff2"/>
        <remove src="fonts/poppins/bold/poppins-700.woff2"/>
    </head>
</page>
These will remove font nodes that we added in our athlete2 child theme.
That is all.
We left declarations for the fonts that we want to keep on mobile in _typography.less and removed the rest and added “remove” nodes for the font that we want to remove in default_head_blocks.xml
Download Examples
We’ve prepared example for some of Canada Child Theme for Athlete2 mobile theme with 2 self-hosted fonts. Install it and set as your mobile theme instead of Athlete2 original mobile theme in Magento 2 admin panel. Note that Athlete2 mobile theme should also be installed.
Also note that below example expect that you have installed child theme from How to add custom font section above. So in the end you should have 4 themes in total: athlet2 theme, athlet2 child theme, athlete2 mobile theme (with parent theme set to athlet2 child theme), athlete2 mobile child theme (which you can download below).
Also, I want to remind that, if you added a child theme for Athlete2 theme and want to use Athlete2 mobile theme, then you need to set your child theme as parent in Athlete2 mobile theme.
To do this open theme.xml in athlete2 mobile theme ( app/design/frontend/Olegnax/a2m) and change “parent” value from athlete2 to your child theme name, e.g.: Olegnax/athlete2_child

