Introduction
In this article we will teach you how to easily setup Magento 2 with Varnish and Nginx as SSL Termination on Ubuntu in a few steps by configuring nginx block only. As simple as that! But what is varnish and why do we need ssl termination?
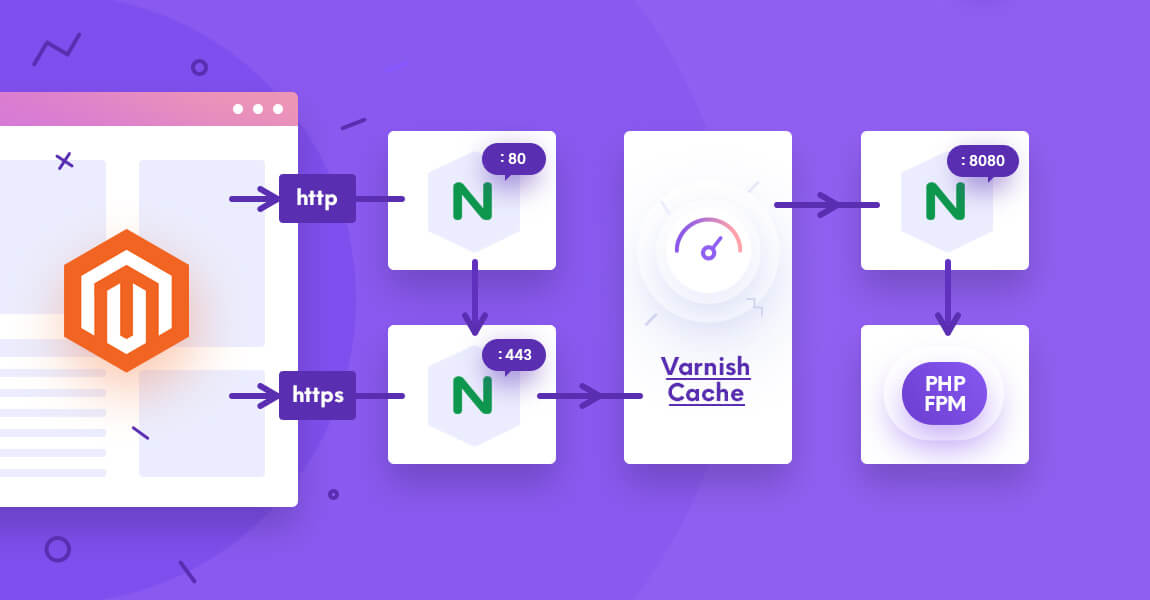
Varnish Cache is a web application accelerator designed for content-heavy dynamic websites like Magento 2. Varnish Cache can greatly increase the speed of your Magento store and what’s important Magento 2 supports Varnish 4+. However it has an issue which we are going to solve it this article. Unlike web servers like Apache and Nginx, Varnish was designed for using it exclusively with the HTTP protocol. So to make it work with HTTPS we will have to put Nginx in front of it to handle incoming SSL requests and forward them to varnish. You can get an idea of how it works from the image above. Actually we will handle all requests with Nginx and forward them to Varnish. It is not really a good idea to put Varnish in front of your web server and doesn’t give you any benefits. We want to redirect all HTTP requests to HTTPS to make website more secure and to satisfy the new google requirements, so placing Varnish in front to listen http as it is recommended in most tutorials including Magento official documentation makes no sense.
You can check this Varnish setup in action on our Athlete 2 Magento 2 theme demo.
Prerequisites
We expect that you already have Ubuntu VPS with installed LEMP stack, Magento2 and your server is listening HTTP. If you are DigitalOcean customer you can install LEMP in one click: https://marketplace.digitalocean.com/apps/lemp
Update your local package index:
sudo apt updateSSL Configuration
First of all we need an SSL certificate to handle HTTPS requests. We will use free Let’s Encrypt certificates. To obtain an SSL certificate we need to install the Certbot software on your server.
1. Install Certbot
Add certbot repository:
sudo add-apt-repository ppa:certbot/certbotInstall Certbot’s Nginx package with apt:
sudo apt install python-certbot-nginxIt is now installed and ready to use.
Certbot will look for server block with server name directive that matches your domain in your Nginx configuration to automatically configure SSL.
1.1. Create Server Block
You should already have server block for your domain /etc/nginx/sites-available/yourdomain.com with some basic configuration like server_name directive and Magento 2 root folder i.e.:
upstream fastcgi_backend {
     server  unix:/run/php/php7.2-fpm.sock;
}
server {
    server_name yourdomain.com;
    listen 80;
    set $MAGE_ROOT /var/www/yourmagentofolder;
    include /var/www/yourmagentofolder/nginx.conf.sample;
}
* nginx.conf.sample is Nginx configuration file which comes with Magento. You check how to install and configure Magento 2 on Nginx on Magento official website.
If you have just created server block you need enable it:
sudo ln -s /etc/nginx/sites-available/yourdomain.com /etc/nginx/sites-enabled/and test nginx configuration:
sudo nginx -tIf everything is ok reload nginx :
sudo systemctl reload nginxNow Certbot will be able to find server block to add SSL configuration.
2. Allow HTTPS Through the Firewall.
If you have the ufw firewall enabled you’ll need allow HTTPS traffic.
sudo ufw allow httpsYou can then check the status using this command:
sudo ufw status3. Obtaining an SSL Certificate using certbot:
sudo certbot --nginx -d yourdomain.comCertbot will ask your email and if you are willing to redirect all requests to HTTPS. Choose No redirect, we will add it later in our configuration.
If Certbot will be able to find server block and verify that you are the owner of the domain for which you requested the certificate you will get a successful message:
 - Congratulations! Your certificate and chain have been saved at:
   /etc/letsencrypt/live/yourdomain.com/fullchain.pem
   Your key file has been saved at:
   /etc/letsencrypt/live/yourdomain.com/privkey.pem
   ...
You should have something like this in your server block after certificate is added:
server {
    server_name yourdomain.com;
    listen 80;
    set $MAGE_ROOT /var/www/yourmagentofolder;
    include /var/www/yourmagentofolder/nginx.conf.sample;

    listen 443 ssl;
    ssl_certificate /etc/letsencrypt/live/yourdomain.com/fullchain.pem; # managed by Certbot
    ssl_certificate_key /etc/letsencrypt/live/yourdomain.com/privkey.pem; # managed by Certbot
    include /etc/letsencrypt/options-ssl-nginx.conf; # managed by Certbot
    ssl_dhparam /etc/letsencrypt/ssl-dhparams.pem; # managed by Certbot

}
Certbot will add certificates and include ssl configuration files to your server block.
Enable SSL in Magento 2
After we have installed SSL certificates we need to configure Magento 2 to use secure URLs. It is better to do this before we configured HTTP to HTTPS redirection, because after that may not be able to access Magento admin panel.
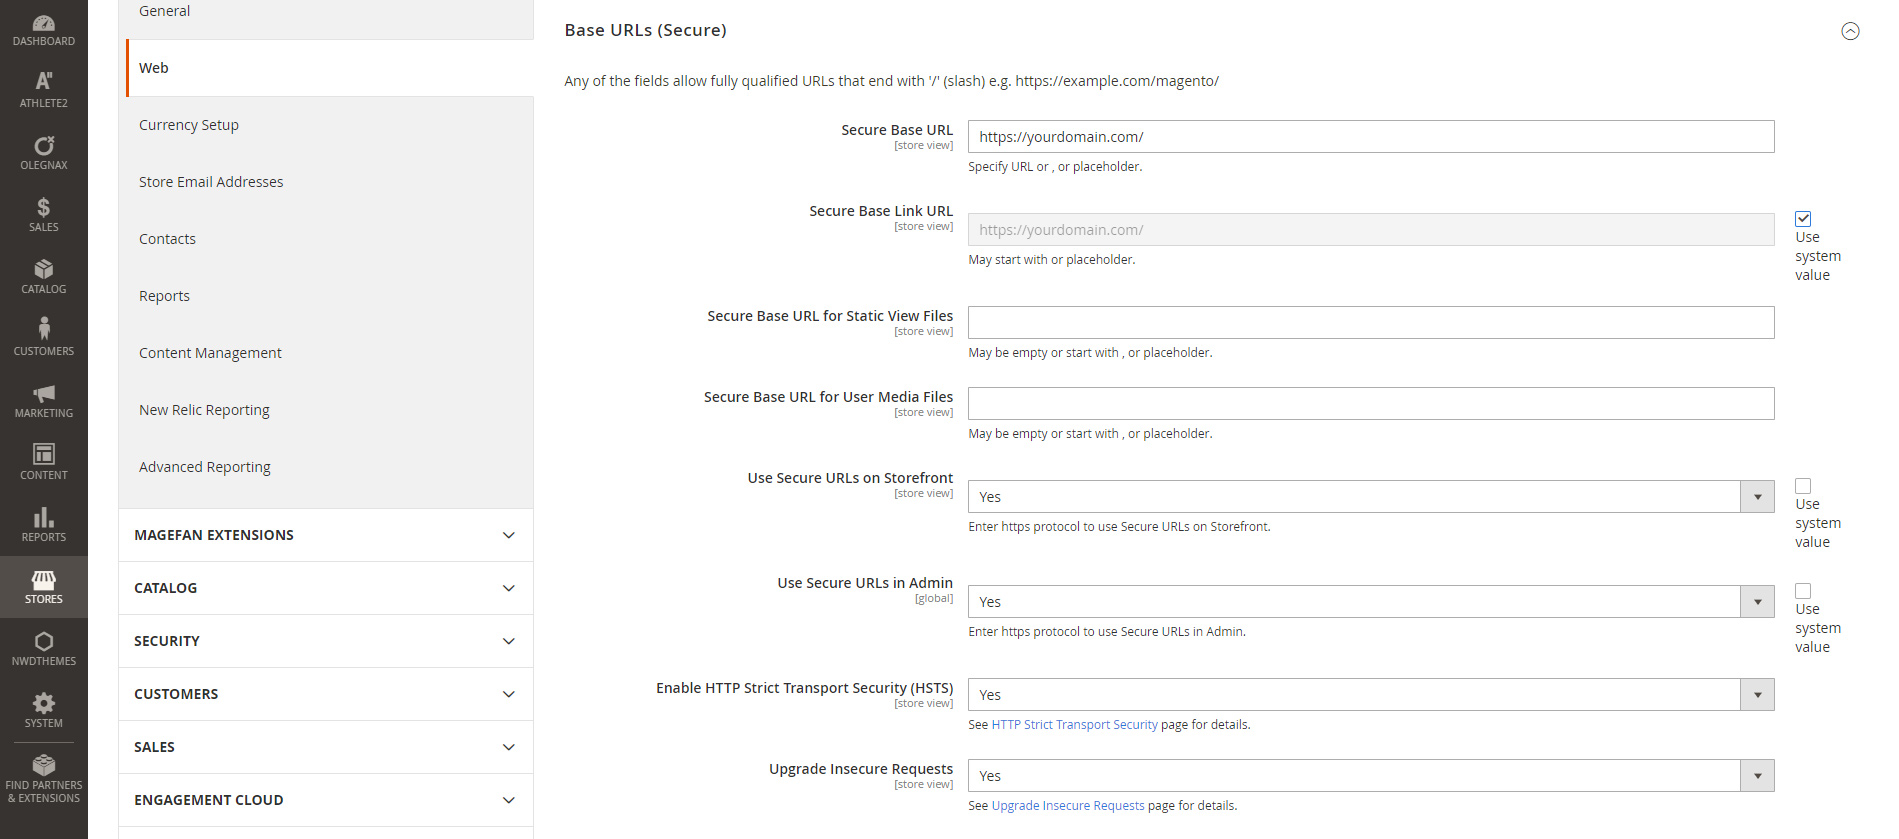
- To do this login to Magento 2 admin panel and navigate to Stores > Configuration.
- Click Web under General menu and expand Base URLs (secure) section.
- Set your website secure URL and enable Use Secure URLs in Storefront and Use Secure URLs on Admin.
- We also suggest to enable HTTP Strict Transport Security and Upgrade Insecure Requests to avoid issues with mixed content.

You can also change Magento 2 store configuration using command line in case you are not able to access admin panel, i.e:
php bin/magento setup:store-config:set --use-secure-admin=1Flush cache:
php bin/magento c:fVarnish Installation
You can simply install varnish with apt command:
sudo apt install varnish -yAfter that you need to start Varnish. Use following commands to start Varnish and launch it at system boot:
systemctl start varnish
systemctl enable varnish
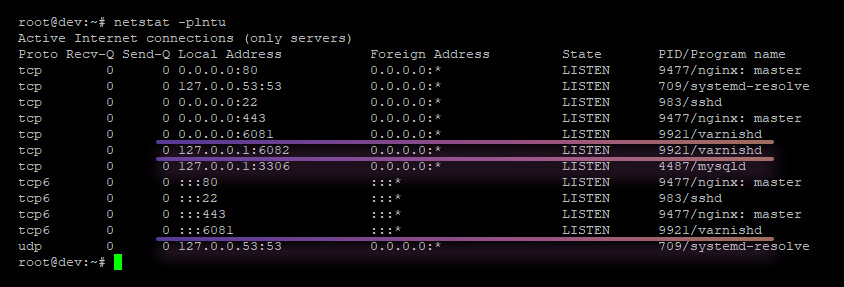
By default, Varnish is configured to listen on port 6081 for public access and 6082 for the backend.
You can check if Varnish is running and its port using netstat command:
netstat -plntu
Nginx Configuration
Open your Nginx server block (i.e.:nano /etc/nginx/sites-available/yourdomain.com) change the content of the file to following:
upstream fastcgi_backend {
     server  unix:/run/php/php7.2-fpm.sock;
}
server {
    server_name yourdomain.com;
    listen 127.0.0.1:8080;
    set $MAGE_ROOT /var/www/yourmagentofolder;
    include /var/www/yourmagentofolder/nginx.conf.sample;
}
1. This is our final destination which is requested if there is no cache in Varnish. This is where we add our Magento installation folder and configs. It can’t be accessed from the world and in our example we listen port 8080.
2. Redirect all http requests to https to make your website more secure and to satisfy the new google requirements
server {
    listen 80;
    server_name yourdomain.com;
    return 301 https://yourdomain.com$request_uri;
}
3. Finally here is where we handle HTTPS requests and forward everything to default Varnish port.
server {

    listen 443 ssl http2;
    server_name yourdomain.com;

    access_log /var/log/nginx/yourdomain-access.log;
    error_log /var/log/nginx/yourdomain-error.log;

    ssl_certificate /etc/letsencrypt/live/yourdomain.com/fullchain.pem; # managed by Certbot
    ssl_certificate_key /etc/letsencrypt/live/yourdomain.com/privkey.pem; # managed by Certbot
    #include /etc/letsencrypt/options-ssl-nginx.conf; # managed by Certbot
    ssl_dhparam /etc/letsencrypt/ssl-dhparams.pem; # managed by Certbot
    ssl_ciphers EECDH+CHACHA20:EECDH+AES128:RSA+AES128:EECDH+AES256:RSA+AES256:EECDH+3DES:RSA+3DES:!MD5;
    ssl_session_cache shared:SSL:10m;
    ssl_session_timeout 24h;
    keepalive_timeout 300s;

    # OCSP stapling
    ssl_stapling on;
    ssl_stapling_verify on;

    # HSTS (ngx_http_headers_module is required) (63072000 seconds)
    add_header Strict-Transport-Security "max-age=63072000" always;

    location / {
        proxy_pass http://127.0.0.1:6081;
        proxy_set_header Host $http_host;
        proxy_set_header X-Forwarded-Host $http_host;
        proxy_set_header X-Real-IP $remote_addr;
        proxy_set_header X-Forwarded-For $proxy_add_x_forwarded_for;
        proxy_set_header Ssl-Offloaded "1";
        proxy_set_header X-Forwarded-Proto https;
        proxy_set_header X-Forwarded-Port 443;
        proxy_redirect  http://yourdomain.com:8080/  /;
        proxy_http_version 1.1;
    }
}
We have enabled HTTP/2 to make all requests downloaded in parallel instead of in a queue. This will provide significant load speed boost because Magento 2 has lots of requests. With HTTP/2 enabled you should keep js bundling disabled in Magento 2 configuration (Actually you should always disable it).
HTTP/2 has a blacklist of old and insecure ciphers, so we update ssl_ciphers in our configuration and commented out certbot default ssl configuration with old ciphers options-ssl-nginx.conf. You can get ciphers from here: https://ssl-config.mozilla.org/
Additionally we added some caching to SSL with ssl_session_cache, ssl_session_timeout, ssl_stapling, keepalive_timeout. Following settings allow to reduce response time from server wasted on ssl handshake. You can save like 100-200ms.
We have added redirect from HTTP to HTTPS in our nginx server block but to avoid those redirects and reduce server response time we also enabled HSTS . If the browser finds an HSTS header, it will not try to connect to the server via regular HTTP again for a given time period (max-age=63072000).
location / is our ssl termination configuration. We forward all requests to Varnish default port 6081 proxy_pass http://127.0.0.1:6081;
Check Nginx configuration for syntax errors:
sudo nginx -tRestart the Nginx server to apply the changes.
sudo systemctl reload nginxMagento Configuration
To configure Magento to use Varnish:
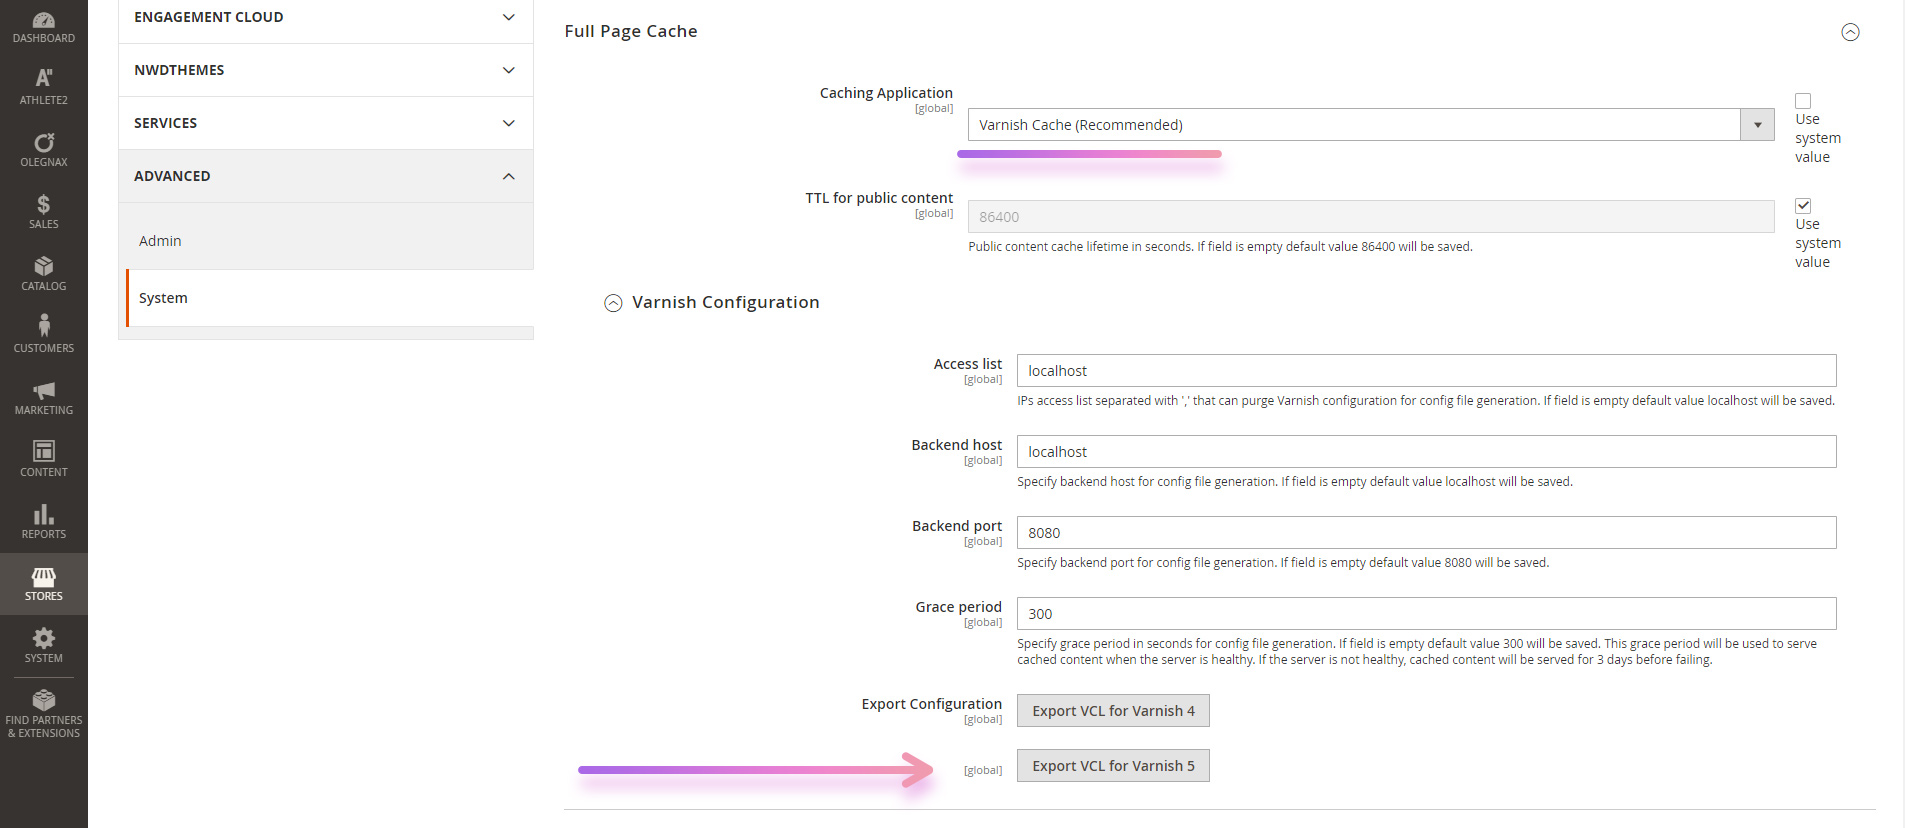
- Log in to the Magento Admin as an administrator.
- Click STORES > Settings > Configuration > ADVANCED > System > Full Page Cache.
- From the Caching Application list, click Varnish Caching.
- Enter a value in the TTL for public content field (optionally).
- Expand Varnish Configuration
With our configuration you can use default settings.
Access list and Backend host – you can leave it as default localhost or 127.0.0.1.
Backend port – In our configuration we use default port 8080.
Check Magento Official documentation for details.

Export a Varnish configuration file
The only important part in our case is pre-configured vcl file which you can export in Magento 2 in one click.
Save the configuration and click Export VCL for Varnish 5
Copy of VCL will be saved in var folder of your Magento 2 installation /var/www/yourmagentofolder/var/varnish.vcl
Back up your existing default.vcl in /etc/varnish/. Then rename the varnish.vcl file you just exported to default.vcl. Then copy the file to the /etc/varnish/. directory.
cp /etc/varnish/default.vcl /etc/varnish/default.vcl.bak2
mv /var/www/yourmagentofolder/var/varnish.vcl default.vcl
cp /var/www/yourmagentofolder/var/default.vcl /etc/varnish/default.vcl
Restart Varnish and Nginx:
sudo service varnish restart
sudo service nginx restart
Test Varnish
How to check if varnish is working? Well, you should notice with your naked eyes that your website is now loading much faster. If you need tools, you can use following commands to test Varnish:
1. View Varnish access log with varnishncsa command:
varnishncsaStart the command and access your website via web browser.
2. If you want detailed view for each request use varnishlog command:
varnishlogSame as with previous command, you need to start it and access your website in web browser. You will see a detailed output for each request sent to Varnish.
You can check more useful Varnish cli commands like varnishstat, varnishtop, varnishhist, etc in Varnish Official documentation.
Clear Varnish Cache
1. Clear Varnish Cache with Magento 2
If you set varnish backend port and hosts correctly in Magento settings as described above in this article, then when you clean, flush, or refresh the Magento cache, Varnish purges as well. How Magento cache clearing works with Varnish
2. Clear entire Varnish Cache
In order to clear entire Varnish cache, you can simply restart Varnish:
sudo service varnish restartOr
sudo systemctl restart varnish3. How to clear varnish cache for specific URL
You can clear cache for specific page on your website using varnishadm:
varnishadm -T 127.0.0.1:6082 -S /etc/varnish/secret ban "req.http.host == https://yourdomain.com && req.url == /somepage/"This will clear cache for https://yourdomain.com/somepage/
Conclusion
In this article we’ve described how to make Varnish work with Magento 2 and SSL on Nginx with minimum configurations:
1. We simply installed Varnish with default settings.
2. We’ve enabled Varnish in Magento 2 and generated Varnish configuration file with default settings.
3. All changes was made in Nginx server block only.
This makes troubleshooting much easier since you only work with a single file.
We force redirect all http requests to https to make your website more secure and to satisfy the new google requirements. To avoid the delays from redirection we’ve added HSTS response header. SSL makes your website more secure but now requires some time for “handshaking” so we’ve enabled SSL cache and stapling to reduce the delay. Since Magento 2 has lots of requests we have enable HTTP/2 to load requests in parallel instead of a queue.
All in all, you should now have noticeable load speed boost for your website simply by enabling Varnish and configuring Nginx server block.
You can check Varnish in action on our Athlete 2 Magento 2 theme demo.
Want all of this to be done in a single click?
This article is written for unmanaged VPS which is recommended for experienced users who prefer to manage all the aspects of their infrastructure on their own. But if you don’t have technical knowledge it is much cheaper for you to use managed hosting. Manged hosting has at least twice higher price than unmanaged, for example unmanaged VPS on DigitalOcean cost $20 vs $70 for manged Fastcomet and $75 for RoseHosting. However the difference is still in ~ $50 per month, it is a small price for saving you tons of time and guarantee that everything will work fast and secure. If you will decide to hire someone to maintain your server you will have to pay 20-50 per hour.
Managed hosting platforms takes away all the technical complexities, letting you focus on the growth and success of your website. They are usually available 24/7 and ready to take care of your request immediately. And usually you can enable Varnish and other perks in just a couple clicks from user friendly admin panel.


“Error 503 Backend fetch failed”
Please post the full Nginx config. Either you missed something or it was hard to follow.
Also:
include /etc/letsencrypt/options-ssl-nginx.conf; # managed by Certbot
ssl_dhparam /etc/letsencrypt/ssl-dhparams.pem; # managed by Certbot
Not created on Ubuntu 18.04 by certbot.
Thanks for the tutorial.
Setup:
Magento: 2.3.5, Percona, Nginx 1.6, php 7.2, Redis 5 and Varnish 6
Got the same “Error 503 Backend fetch failed”
Fixed by editing /etc/varnish/default.vcl
From:
.url = “/pub/health_check.php”;
To:
.url = “/health_check.php”;
Hope this helps someone
Hi,
I followed your tutorial and everything is fine, but after replacing the Varnish configuration file, the website will be inaccessible and a 502 error message will appear. I tried a lot but it didn’t work. I am using Ubuntu20.04 Nginx PHP7.3 Magento2.3.5-p2, and the Nginx server block is set as in your tutorial. Any suggestions? Many thanks.
Hi Chris,
Hard to say, maybe you set wrong port somewhere, maybe firewall is blocking varnish, it can be anything. So the suggestion is the same for any error – check logs for details, e..g: /var/log/nginx/error.log and google it. There are tons of articles on the web for almost any issue.
Hi, good tutorial, nearest tutorial out there what i need for me.. i think.
what i do not understand is.
each serverblock is a file?
or other question:
do i need more than one file for nginx configuration?
basically i can understand well whats happening with the different ports:
what i do not understand is: do i have to put all the config into one file or do i have to set up more than one?
i think i put everything in one file and have several blocks in one file right?
`Hi there!
Thanks!
I was wondering about this:
listen 127.0.0.1:8080;
That server block, you say it is unreachable from the outside world. But when I use http://website.com:8080 I can reach it without secure connecton…
Only protection is firewall?
Or did I miss something.
Best
R